| C H A P T E R 7 |
|
Generating Code |
Up to this point, you have used the interactive features of X-Designer to build a working prototype of a user interface. Now you can use the code generation features to produce the files necessary to convert that design into a free-standing program. Code can be generated as C, C++, Java or UIL.
This chapter also includes an analysis of the code which is generated into the various files and a discussion of strategies for arranging your files.
You need some knowledge of C, C++, Java or UIL to understand the generated code files and to supply code for callback functions. You also need some knowledge of the X Window System.
The Generate Menu is used to generate source code, X resource files and Makefiles from your design. The Generate Menu has seven items: "C", "C++", "UIL", "X Resources", "Makefile", "Java" and "Generate". The first six options generate the type of file selected provided that you have set up that file in the Generate dialog.
The "Generate" option displays the Generate dialog.
|
Note - In Microsoft Windows mode the Generate Menu has an additional selection to generate Microsoft Windows resource files. This is discussed in Building the Application. |
C is used for the examples in this chapter. The procedure for generating C++ is exactly the same and you may use C++ for the tutorial if you prefer. The procedure for UIL is very similar to the procedure for C with the exception of one additional step which is discussed in Special Notes for UIL.
For information on generating Java, see Chapter 10.
To display the Generate dialog, pull down the Generate menu and select "Generate".
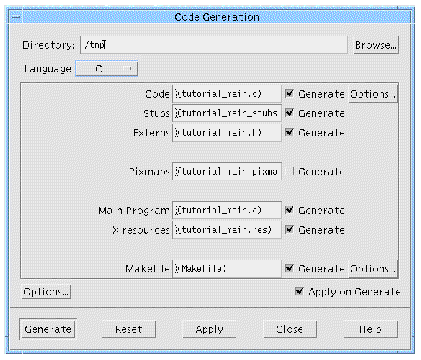
This dialog gives you an overview of all the files which can be generated from your design. The dialog contains some default settings, including default filenames. The default filename is appropriate to the type of file and the language being generated. You can change the defaults in the application resource file. See Filters for more details. If, having generated code, you wish to reset the dialog back to the default filenames (complete with brackets) simply press the "Reset" button.
Before setting up individual files to be generated, you need to set two options which affect all the files:
For the language, use the "Language" option menu at the top of the dialog. You have a choice of C, C++, UIL and Java. When in Microsoft Windows mode, you have the additional choices "C++ (Motif XP)" and "C++ (Microsoft Windows MFC)". See Chapter 11 for more details about Microsoft Windows mode, Motif XP and MFC. This tutorial uses the C language, so:
 Make sure that "C" is selected from the "Language" option menu.
|
Note - Use of the Generate Dialog is quite different when "Java" is the selected language. For this reason, the Generate Dialog for Java code generation is explained in Generate Dialog in Chapter 10. |
When you work in UIL, the code generation procedure is basically the same as for C. However, because UIL is not as powerful a language as C, there are some features of X-Designer which cannot be implemented in UIL. To get the full functionality of your design, a supplementary C file must be generated in addition to your UIL file.
When you select "UIL" from the Language option menu, enter the name of the UIL file in the "UIL" field and the name of the supplementary C file in the "Code" field. You must also specify a name for the compiled UIL file. This is done by pressing the Code "Options" button and then entering the name in the "Uid file" field.
"Includes" (see Setting up the Primary Source File), "Main program", and "Links" (see Code Generation Options) can be generated into the C file but not into the UIL.
UIL is a Motif-specific language and does not work with widgets outside the Motif toolkit. If your design contains a widget from another toolkit, you must use C or C++.
To set the base directory you can type it directly into the text box labelled "Directory" or you can press the "Browse" button. The "Browse" button displays a file selection box so that you can find and select a directory. The filenames of the files to be generated are relative to the base directory. By default, the base directory is the directory from which you last opened a saved design or, if you are working on a new design, the directory from which you invoked X-Designer. The default, which is shown enclosed in brackets, is not saved into your ".xd" file. An explicitly named directory will be saved.
You can type an absolute pathname into the filename text boxes. This method is not recommended because you would have to do this for every file. It is easier and less prone to typing mistakes if you set up the directory first and assume all files are relative to that directory.
In the text box labelled "Code", enter the filename of your primary source file. A description and explanation of this file is given in Analysis of the Primary Module.
1. Type: icecream.c into the text box labelled "Code".
By convention, all C files, including primary source files and stubs files, have the suffix .c.
2. Check that the "Generate" toggle next to the text box is set.
Only those files which have the "Generate" toggle set will be generated.
3. Press the button labelled "Options" beside the "Code" filename.
This button displays the options relevant to the primary source file.
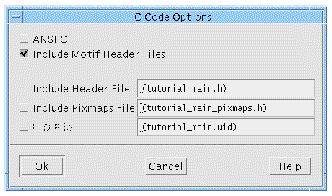
The Options Dialog for the primary source file offers the following:
|
Note - If you generate a separate code and main program file, you must include the generated externs file so that both files can use the same variables. |
4. Press "Ok" to close the Options dialog.
5. Press "Apply" in the Generate dialog.
This will save everything you have set up without generating straight away.
As part of your design, you can specify the names of files to be added as include files in the generated code. By default, X-Designer generates these include statements with angled brackets, as in the following example:
#include <externs.h>
This behavior is not suitable for all language types and for all configurations. The following resources now allow you to control the way in which "#include" statements are generated:
The first statement controls whether the external files are included in quotations or not, the second controls the generation of header files which are automatically generated by X-Designer (the xdclass.h files).
This mechanism overrides the default behavior. Explicitly placing "" or <> around the name of the header file when you type it into the Primary Source File Options dialog overrides these defaults.
If you wish to include both an external header file (not created by X-Designer) and an Externs file created by X-Designer in your code file, you can enter the name of the external header file in the "Include Header File" field and then make sure that this header file includes the Externs file generated by X-Designer.
When you set the "Include Header File" toggle in the Code Options dialog and enter the name of the externs file, the file is included in the code file, the stubs file (if you are generating one) and the main program file (if it is different from the code file).
If you are generating a separate code and main program file, you must include the externs file because they both use variables which are defined in the externs file.
Callback stubs, i.e. "empty" routines with the specified callback or method name, are generated for all callbacks and callback methods in your design. These are generated into a separate source file called a Stubs File. If you have callbacks or methods in your design, generating a stubs file allows you to compile the application since the callbacks are referenced from the main source code. It is left to you, however, to add the required functionality to the callback routines. You are shown how to do this in Adding Callback Functionality.
Along with the callback stubs, X-Designer generates special comments. These comments are explained in Stubs File Comments.
Your design has just one callback: quit(). For now, generate a stubs file with an empty quit() function. The dummy function lets you compile, link and run your application as a prototype. Later (in Adding Callback Functionality), you will add functionality to quit() to complete your application.
1. Type: stubs.c in the text box labelled "Stubs".
2. Set the "Generate" toggle next to the text box.
Remember that only those files with a selected "Generate" toggle will be generated.
There are no separate options for the Stubs file.
X-Designer can generate a header file with extern declarations for all widgets which are global in scope, C++ class definitions and C structure definitions for your design. Global widgets include all widgets which you have explicitly named and those which you have designated as global on the Core resource panel.
To set up an Externs file, type the name of the file in the text box labelled "Externs" and set the "Generate" toggle next to it. By convention, Externs files have the suffix .h.
|
Note - Make sure that the "Generate" toggle next to the text box labelled "Externs" is not set because you do not need an externs file for the tutorial. |
To include the generated Externs file in your primary module, see the description of the Options dialog in Setting up the Primary Source File. X-Designer then generates a #include directive instead of explicit type definitions in the primary source file. Global widgets are still allocated in the main source file when you do this.
The Externs file is also useful for including in your stubs file or other code files where you access global widgets or refer to type definitions. See Global Widget Variables for more details.
There are no separate options for the Externs file.
The Pixmaps file is similar to the Externs file. It is a header file with static declarations of all the pixmaps in your design. Generating one of these files lets you keep the cumbersome definitions of pixmap structures separate from your primary source file.
To generate a Pixmaps file, type the name of the file into the text box labelled "Pixmaps" and set the corresponding "Generate" toggle. By convention, Pixmaps files have the suffix .h.
|
Note - Make sure that the "Generate" toggle next to the text box labelled "Pixmaps" is not set because you do not need a pixmaps file for the tutorial. |
The main program file is a file containing the main() procedure. By generating a separate file you can keep this procedure away from the rest of your source code. This is useful if you need to edit the procedure to perform some of your own initializations or call other parts of your application before starting off the user interface. If you edit this file, make sure that you generate it only once as subsequent generations will overwrite your changes. A full description of the main() procedure is provided in Description of the Main Program.
If you wish the main() procedure to be generated into the primary source file, make sure that the text box labelled "Main program" contains the same name as the "Code" text box and the corresponding "Generate" toggle is set.
1. Check that the base directory is set.
See Setting the Base Directory.
2. Type: icecream.c into the text box labelled "Main Program".
3. Check that the "Generate" toggle next to the "Main Program" text box is set.
There are no separate options for this file.
As you have seen in Chapter 3, resource settings need to be available or they are not applied when your interface runs. You can make them available in one of two places: the primary source file or the X resource file. Generating resources into the source file is known as hard-wiring them.
1. Check that the base directory is set. See Setting the Base Directory.
2. Type into the text box labelled "X resources" the filename: icecream.res
3. Set the "Generate" toggle next to the text box.
You can control which resources are generated and into which file by setting the options described in Code Generation Options.
X does not automatically recognize icecream.res as your application's resource file. One recommended method of telling X where to find this file is to copy the resource file to the designated application resource directory (/usr/lib/X11/app-defaults on POSIX systems). The filename in that directory should be the application class name, XDTutorial, without a suffix (see Code Generation Options for details on how to set the application class name). This method avoids any confusion of this application-specific resource file with other files you might be using.
Because you may not have access permission to the application resource directory, a different method is described here.
 Set the environment variable XENVIRONMENT to the filename of the resource file.
The exact syntax for doing this will differ depending on which shell you are using. For a C shell, enter:
setenv XENVIRONMENT icecream.res
XENVIRONMENT=icecream.res export XENVIRONMENT
There are other ways to get X to recognize your X resource file. To find out what they are, you will need to look them up in a book about the X Window System. See Appendix F for the names of some books you may wish to try.
X-Designer can generate a makefile containing compilation instructions for all the files required by your design with the correct dependencies. For the tutorial, your makefile needs to compile both icecream.c and stubs.c. It also needs to link the resulting object files with the required libraries.
1. Check that the base directory is set to the directory where your primary source file and stubs file have been or will be generated.
2. Type "Makefile" into the text box labelled "Makefile" and check that the "Generate" toggle is set.
3. Press the button labelled "Options" next to the Makefile text box.
This displays the Makefile Options dialog, shown in FIGURE 7-3.
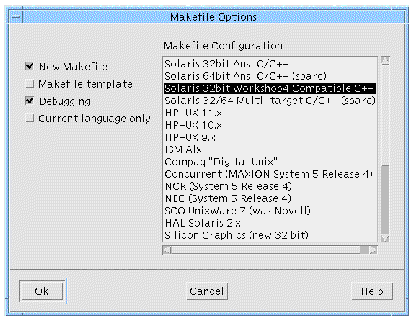
In order to generate a Makefile, X-Designer uses an internal makefile template which contains information about different platforms and environments. Using the template mechanism, X-Designer is also able to create a Makefile which can build the sources generated from more than one design into one application.
The "New Makefile" and "Makefile Template" toggles in the Makefile Options dialog relate to the two different types of makefile that you can generate: a simple makefile, which just builds the sources from one design, and a makefile with templates, which allows further sources to be added to it. "Debugging" refers to the "-g" flag for the compiler.
When you generate code in one language and then generate another set of code files in another language, all Makefiles generated afterwards will contain rules for both sets of generated files. Setting the "Current language only" toggle ensures that you are generating a Makefile for the current language only.
The right of this dialog shows the list of target platforms and compilers for which X-Designer can automatically generate a Makefile. This list also gives you the option of compiling a 64-bit application. All aspects of this dialog are explained more fully in Chapter 19.
This section shows you how to generate a simple Makefile capable of building the sources from your tutorial design. For more details on Makefile generation, including using templates and customization of Makefiles, see Chapter 19. For details on how to change the Makefile template application resource, see Generation in Appendix E.
1. For the tutorial, set the "New Makefile" toggle but do not set the "Makefile Template" toggle.
You are not going to add any more source files to the tutorial application so you do not need the template comments.
2. You may turn off the "Debugging" toggle if you prefer.
We shall not be using debugging in this tutorial.
3. Check that the selected item in the list on the right of the dialog matches your target platform and compiler.
The item selected by default should be appropriate. If you are not sure, ask your system administrator. More information on this list is given in The List of Makefile Types.
4. Press "Ok" to save your changes and close the Makefile Options dialog.
This takes you back to the Generate dialog.
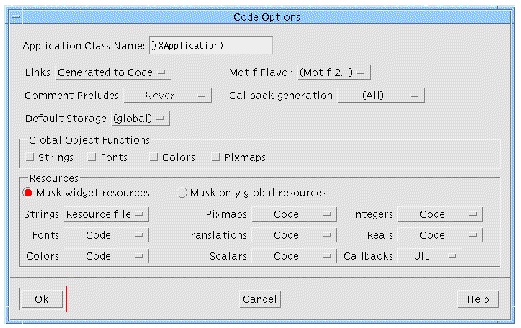
Before generating any files, you should check to see whether you need to change any of the code generation options. Press the "Options" button at the bottom of the Generate dialog. The dialog in FIGURE 7-4 appears.
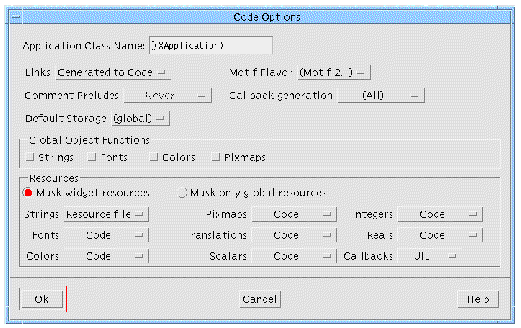
This dialog lets you control where, and whether, the code for links is generated, specify the application class name and control where individual resource types should be generated. These are explained separately below.
The application class name is used to identify resource settings when you generate an X resource file. Assigning a name other than the default "XApplication" prevents confusion of your resource values with system-wide X resources.
Using the option menu labelled "Links", you can choose whether the links are generated into the primary source file, into the stubs file or not generated at all. Alternatively, you could choose to generate the links code declarations only.
The code created as part of the links functionality consists of a set of generic functions (one for each type of link) and the declarations of these functions. Because the functions are always the same, you only need to generate one set of the functions for your whole application. If you are generating code from more than one design, each of which contains links, you only need to generate the functions once but you will need to generate the declarations for each design. The declarations are always generated into the primary source file.
X-Designer allows generation of global accessor functions for color, font, string and pixmap objects. This means that these objects can be shared across different files in your application. The toggles in the Code Options dialog allow you to make color, font, string and pixmap objects global. When selected, these toggles cause X-Designer to create one function per object which returns the object. X-Designer uses the name of the object to build a function name using the following algorithm:
xdGet + <object_name> + <object_type> + Object
where <object_name> is the name you bound to your object and <object_type> is one of "Color", "Font", "String", "Pixmap", depending on the type of the object. For example, a color object named "Foreground" would be generated by default with the accessor name:
xdGetForegroundColorObject
The xdGet tag can be overridden through the resource:
XDesigner.globalObjectFunctionStart: xdGet
For example, suppose you have:
XDesigner.globalObjectFunctionStart: my
and with a single color object "Background", you would have the following code generated if the global object toggle for color is set:
By default, X-Designer generates each widget as a variable local to the function in which it is created. If you name a widget, however, X-Designer makes the variable global. This default behavior, for named widgets, can be controlled in the Code Options dialog by changing the "Default storage" option menu.
If a widget belongs to a class (i.e. is the child of a widget which has been made a class), however, it will remain a variable of that class, regardless of the storage option chosen in the Code Options dialog.
The default storage for named widgets is "global". You can change this default by setting the following resource:
XDesigner.defaultStorageType: static
The possible values of this resource are:
This option menu refers to the special comments which appear in the generated code around the areas where preludes can be added. Adding preludes is described in Customizing the Generated Files: Preludes. You can choose whether you wish comments to be added "Always" (whether a prelude has been specified or not), "When Defined" (i.e. only when a prelude has been specified) or "Never". The default is "Never".
The example below shows a comment for a shell pre-manage prelude. Because there is no prelude inside the comment we must assume that "Always" was the selected option:
The Motif Flavor menu contains two options:
These refer to the version of Motif for which you can generate code. Motif underwent considerable change with version 2.1, adding new widgets and resources along with new support for clipboard operations (drag and drop etc.) and popup menus. The following widgets were added:
If you use these widgets and you wish to generate Motif 1.2 code, X-Designer chooses a suitable substitute for the new widget. The following table shows how the new widgets would be mapped:
Resources which are only available in Motif 2 are marked "M2.1" in the resource panels. Resources which have been deprecated are marked "D2.1". If you choose "Motif 2.1" flavor, all deprecated resources are ignored. If you choose "Motif 1.2", all Motif 2-only resources are ignored.
The Callback generation option menu controls what is generated for callbacks, as described for individual callbacks in Callback Generation Option Menu. The option selected here represents a general rule - any option selected for individual callbacks in the Callbacks Dialog always takes precedence.
The panel in the middle of the Options dialog contains references to each type of resource.
Motif defines the following resource types:
You can specify into which file each resource type should be generated. If a resource is generated into the source code it is then hard-coded and cannot be modified through the resource file. Typically, any resources which are not generated into the source code are generated into the X resource file, where they can be edited by the end user. See Setting up the X Resource File for more details on X resource files.
The option menu labelled "Callbacks" only appears if you have selected UIL as the language type. This lets you choose whether callbacks are registered in the UIL code or the C code. By default, they are registered in the UIL. If you use client data, however, you should generate the callbacks into the C code, because structure types cannot be defined in UIL. See Special Notes for UIL for an explanation of the C for UIL file.
For the tutorial, make the following changes in the Generate Options Dialog:
1. Select "Generated to code" from the "Links" option menu.
2. In the "Application Class Name" text box type: XDTutorial
3. Make sure that the resource type option menus are set as shown in FIGURE 7-5.
Note that the callbacks option menu is shown. This is only displayed if you have selected UIL as the language type.
4. Make sure that the "Mask widget resources" radio button is on.
The significance of this radio button is discussed in Masking Resources.
If you look at any resource panel, you will see that it contains unlabeled toggles next to each resource, as shown in FIGURE 7-6.
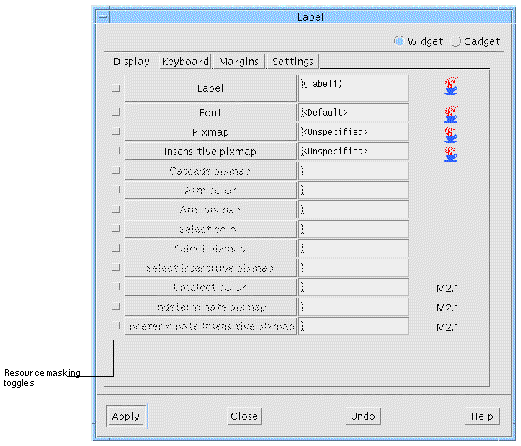
These work in combination with the "Mask widget resources" and "Mask only global resources" radio buttons in the Generate Options dialog. Using these gives you control over the generation of resources on an individual basis.
You can apply these toggles to any number of widgets at once by using multiple selection in the widget hierarchy. When viewing the state of the toggles for more than one widget, the toggle can be in one of three states: on, off or mixed. If all of the selected widgets have the same setting for this toggle, it shows on or off, as appropriate. If they have different settings, however, it shows the mixed state.
The following description applies when the "Mask widget resources" toggle is set:
If an individual resource does not have its resource panel toggle set, the resource is generated according to the option menu for its type in the Generate dialog--i.e. a Label string with the resource panel toggle "off" will be generated to the file specified by the option menu labelled "Strings".
If an individual resource does have its resource panel toggle set, the resource is generated to the opposite file from the one specified for its type by the option menu in the Generate dialog--i.e. an integer resource with the resource panel toggle on will be generated to the resource file if the "Integers" option menu is set to "Code" and to the code file if the option menu is set to "Resource file".
Another way of saying this is that the option menus in the Generate dialog establish a general rule and the toggles in the Resource Panels identify exceptions to this rule.
The following description applies when the "Mask only global resources" is set:
The option menus in the Generate dialog now apply only to global objects (font, color and pixmap objects). These (and only these) are controlled exactly as discussed for all resources in Mask Widget Resources.
All other resources are controlled only by their individual resource panel toggles. They are generated into the code file if the resource panel toggle is off and into the resource file if the resource panel toggle is on.
In many cases, designers want to generate most strings into an X resource file so that they can be edited easily. This makes it possible to produce a foreign-language version of the application simply by editing the X resource file. To do this, you generate strings into the X resource file. However, there may be a few strings, such as the company's address, which you do not want users to be able to change. You can hard-wire these few string resources by setting their individual masking toggles.
Similarly, you might want to let users edit nearly all color resources except for your company colors. To do this, set the masking toggles on the individual resources which control the company colors. When you generate code, generate colors as a group into the resource file. X-Designer hard-wires the tagged ones into the source code.
Default resource values, shown in brackets on the resource panels, are never generated into either file. In this case, Motif calculates the resource value at run time. The result may be different from the default value you saw while building the interface, depending on the platform you run the program on. Using default values is often helpful in making your application portable.
When you have finished setting up the files you wish to generate and their options in the Generate dialog, you can press "Apply" to save the settings or "Generate" to generate the files straight away. If you select "Apply" you can invoke the Generate dialog when you are ready and then generate all the selected files, or you can select the relevant button on the toolbar (or in the Generate menu) to generate individual files using the settings you applied earlier without producing the generate dialog again. If you have set the "Apply on Generate" toggle, pressing "Generate" performs a "Apply" as well as generating the requested files.
Having set up the Generate dialog with the files you wish to generate and their associated options, you are now ready to generate code and run your prototype application.
1. To generate all the files for your prototype, display the Generate dialog and press the "Generate" button.
2. Make sure that you are in the directory where the files were generated, as specified in the Generate dialog.
3. Set XDROOT to the path to the root of the X-Designer installation directory.
4. To build your prototype, type: make
5. Make sure that X can find your X resource file.
See Making X Find Your Resource File.
6. To run your prototype, type: icecream
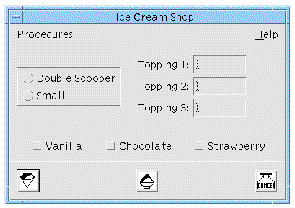
As in the dynamic display, all the widgets in your prototype are functional. You can click on the buttons, pull down the menus, and so on. Your prototype also includes links. You can display the help screen by pulling down the menu at the right side of the screen and clicking on its single entry; you can make the help screen disappear by clicking on its button.
Although your prototype also calls quit() when you click on exit_button, quit() doesn't do anything because you have not yet supplied the code to make it functional. This will be added in the following section. To terminate your prototype when you have finished examining it:
7. Use the window manager to close the main window.
All that remains to complete the tutorial is adding functionality to quit(). X-Designer provides a means of editing callbacks directly in the stubs file.
The Callbacks dialog contains a button labelled "Edit Code". Next to this button there is an option menu allowing you to tell X-Designer which language the stubs file is using. This is to prevent ambiguity if you are generating both C and C++. You will not normally need to use this option menu as X-Designer will usually choose the correct value for you. See Designating a Callback for a description of the Callbacks dialog.
In order to allow you to edit the generated code to add code to your callback function, X-Designer uses the script file xd_edit which is found in:
$XDROOT/lib/scripts
where XDROOT is the install directory of your X-Designer. This file has some pre-configured information for the following editors:
To work out which editor to use, the xd_edit script looks at the value of the environment variable EDITOR first. If that is not set it uses the value of the VISUAL environment variable. If that is also unset, vi is used.
All of these editors, apart from vi, create their own windows. If the editor is vi (or an unsupported editor) the script creates a terminal window, and runs the editor in there. It uses the variable XD_TERM to decide which terminal program to run. If XD_TERM is unset, it uses xterm.
You can add other editors to the xd_edit script. This is explained, along with all the other ways in which the editing mechanism can be configured, in Setting up Callback and Prelude Editing. You are recommended to read this section to check that the editing mechanism is configured to your requirements.
To edit preludes you must have previously generated a code file. If you have not done so yet, you will be prompted to do so.
Before allowing you to edit the stubs file, X-Designer checks to see whether there have been any changes to the design since the last stubs file generation. If so, you are asked whether you wish to regenerate the file before editing. You cannot edit the file if you do not regenerate it.
If you have unsaved changes in an editing window when you try to regenerate the stubs file, you will be asked if you wish to save the file first. If you do save the file first, any callback code you have added will be preserved. See Incremental Stubs File Generation for more details. If you choose to regenerate without saving changes, any changes made since the last save will be lost.
If you do not wish to use X-Designer to edit your callback:
 Open stubs.c with a text editor and skip ahead to Step 5.
To edit your callback from within X-Designer:
1. Select the exit_button widget.
2. Click on the Callbacks button in the toolbar or select "Callbacks" from the Widget menu.
3. Select "quit()" from the list of callbacks.
4. Press the button labelled "Edit code".
Pressing this button opens stubs.c.
The code for quit() looks like this:
void quit (Widget w, XtPointer client_data, XtPointer xt_call_data ) { XmPushButtonCallbackStruct *call_data = (XmPushButtonCallbackStruct *) xt_call_data; } |
1. Replace the text between the braces of quit() by: exit (0);
4. Remake your executable and run the program.
Refer back to Running the Tutorial for details on how to do this.
The "Exit" button is now functional. To quit your program:
5. Pull down the Procedures menu of your interface and click on the "Exit" button.
Callback Functions looks at callbacks in more detail, including the parameters passed to them and the ways in which you can access and manipulate widgets in your design.
The tutorial is now complete. The remainder of this section looks in more detail at the issues discussed in previous sections.
When you subsequently generate the same stubs file, X-Designer reads the special comments in that file in order to work out which callbacks and methods have already been generated. In this way you can add your own code to the stub and it will not be overwritten.
X-Designer then appends any new callbacks or methods to the end of the stubs file. Whenever a new stubs file is generated, the old version is copied to a file with the name you have specified and a .bak extension.
Below is the listing of a stubs file containing one callback, named quit:
At the beginning of the file there is a prelude which X-Designer reads and, effectively, throws away. The prelude is always regenerated anew. Before every stub X-Designer generates a comment giving the name of the callback or method. In this way X-Designer can calculate which stubs it still needs to generate, having read the existing stubs file.
|
Note - You should not alter these comments in any way unless you wish X-Designer to regenerate the stub. |
If you wish X-Designer to regenerate one of the stubs, simply remove the comment preceding the stub and the stub itself. If you remove only one or the other, one of the following will occur:
|
Note - Remember that regeneration of a stub will lose the contents of the routine. |
X-Designer will not remove old stubs even though a special comment no longer matches a callback or callback method.
You may wish X-Designer to regenerate the whole file anew if, for example, you have deleted some callbacks or changed some names, the old ones are still being generated and the file is starting to become full of redundant code. In order to do this, simply remove, or change the name of, the stubs file and the ".bak" file. If X-Designer cannot find a file with the name you have specified for the stubs file, it will generate a new file.
From top to bottom, your primary code module contains the following sections:
This section analyzes the code in your file.
 Open icecream.c with the text editor and inspect it as you read.
The optional portions of the file can be included or excluded by setting toggles on the control panel. These toggles, and the advantages and disadvantages of including the optional sections, are discussed in Code Generation Options.
The primary module has the following header material, in this order:
Your file does not need to have a module heading or module prelude. You can specify code to be inserted in these places from within X-Designer. The procedure for doing so is discussed in Customizing the Generated Files: Preludes.
After some standard X-Designer comments, there is a list of #include statements needed for the code in your module. The #include statements are optional and are controlled by the toggles in the Code Options dialog--see Setting up the Primary Source File.
X-Designer also needs to include its own header file in order to define the base classes that it uses. If you wish to change the name of the file to be included, or not include a base class header file at all, refer to Generation for details of the application resource that you will need to change.
Next, the module contains code for the link functions. The following code fragment shows a typical link function:
void XDunmanage_link ( Widget w, XtPointer client_data, XtPointer call_data )
Generation of this code is optional and is controlled by the Generate Options dialog--see Code Generation Options.
In this section, all globally defined widgets in the design are declared. The following lines are typical:
Only global widgets are declared here. By default, widgets are local in scope. Local widgets are defined in the function which creates their parent Shell and cannot be referenced elsewhere in your application. To make a widget global, you can:
Note that the variable names of Session Shells, Application Shells and Top level Shells are always global in X-Designer and therefore should not be made local. See Shell Types for more information on the different shell types.
Variable names must be unique. If you "Read" or "Paste" widgets into your design whose variable names duplicate names of existing widgets, X-Designer silently removes the duplicate names and assigns new, local, names of the form widget_type<n>, e.g. shell4, form5, etc.
By convention, variable names of widgets should begin with a lower-case letter. This helps avoid conflict with Motif declarations.
By default, X-Designer generates a creation procedure for each Shell widget in your design. The creation procedures are the heart of the generated code. Each creation procedure does the following:
The creation procedures do not display the Shell. Usually, windows are displayed by a function call in the main() procedure or in a callback routine.
By default, creation procedures have the form create_<shell name>, based on the variable name of the Shell. Your design has two Shells: a Dialog Shell, named help_window, and a Session Shell, named myFirstShell. It therefore has two creation procedures: create_myFirstShell and create_help_window. You can change the name of a creation procedure in a code prelude, discussed later in this chapter.
create_help_window has the following form:
The function body has function calls which create the Dialog Shell itself:
help_window = XmCreateDialogShell ( parent, "help_window", al, ac );
Dialog Shells, unlike main application shells, are dependent on another Shell, parent. See Shell Types for more details concerning the various Shell types and their respective behavior.
create_help_window also creates all the Shell's children. The DialogTemplate child, to which you gave an explicit variable name, is created and assigned to a global variable:
dialog_2 = XmCreateMessageBox ( help_window, "dialog_2", al, ac);
The Label, if you did not name it explicitly, is assigned to a local variable as illustrated below. (Note that the widget variable name may be different in your code.)
label1 = XmCreateLabel ( dialog_2, "label1",al,ac);
create_myFirstShell, the creation procedure for your Session Shell, has different arguments because it is a different type of Shell:
See Shell Pre-create Prelude for a discussion of these arguments.
This function is similar to create_help_window, although it is considerably longer as your main window has more child widgets than the help window.
The primary module does not include callback functions themselves. However, it does add any callbacks you have specified to each widget's callback list. create_myFirstShell contains the following lines (not necessarily together) which create the exit_button and add the quit callback.
exit_button = XmCreatePushButton(rowcol1, "exit_button", al, ac); . . . XtAddCallback(exit_button, XmNactivateCallback, quit, NULL); |
An extern declaration of quit() is generated earlier in the source file.
The "Show" link on the widget help_button inserts an Activate callback to the X-Designer function XDmanage_link. The code which creates help_button and adds a link to it looks much like the code which creates exit_button and adds its callback.
help_button = XmCreatePushButton (rowcol2, "help_button", al, ac); . . . XtAddCallback (help_button,XmNactivateCallback, XDmanage_link, (XtPointer) &xd_links[0]); |
A minimal main() procedure is either generated into a separate file or at the end of your primary module. See Setting up the Main Program File for details on generating this procedure into a separate file.
X-Designer's main() procedure does the following things:
As you have seen, this main() procedure is sufficient to run the interface and check its behavior. In many applications, very little additional code is needed in main() because most functionality is handled in callbacks. However, if you need to initialize other parts of your application, you should generate a separate main() procedure source file from the Generate dialog once only and edit the file. Termination code goes in the callback function which is invoked to exit the application.
The syntax for generated resource files, by default, is as follows:
<application name>*<widget name>.<resource>: <value>
For identification purposes, the widget's variable name (not the widget name) precedes the list of its resources in a comment. If a group of widgets share a widget name, however, only one variable name from the group appears. A comment is also generated for any widget which has no resources generated into the file.
 Open your X resource file (icecream.res) with a text editor and look at it.
The file fragment below includes only String resources.
An end user can change any of these strings by editing its value in the X resource file. For example, the second line could be changed to read:
XDTutorial*procedure_cascade.labelString: Closing Up
Resource values in the X resource file are overridden by values for the same resource in the .Xdefaults file in the user's home directory.
If you have set any of the "Include in resource binding" toggles (found on the "Code generation" page of the Core Resource panel) for any widgets in your design, your resource file will look slightly different. The syntax that X-Designer generates for resource files by default is very general--it applies to all widgets with the specified widget name within the whole application. It is often the case that you have more than one widget with the same name. Tight bindings give you more control over widget resources.
|
Note - This section only discusses the syntax of the generated resource file, refer to Tight Bindings for a thorough explanation of tight bindings. |
The example given in Tight Bindings would produce the following line:
XDTutorial*FirstForm*OkButton.labelString: Ok
If you have set any loose bindings, these will appear at the top of the generated resource file. Their syntax is slightly different as they never refer to individual widgets.
|
Note - This section only describes the syntax of resource files--for a thorough explanation of loose bindings, refer to Loose Bindings. |
The example given in Loose Bindings would generate the following line in the resource file:
XDTutorial*XmDialogShell*MyForm.MyButton.labelString: Bound
To identify a widget completely, X requires a list of all the widget's ancestors in the hierarchy as well as the widget's own name. In the generated X resource file, X-Designer uses a wildcard (*) instead of a list of specific ancestors. Thus, each widget is distinguished only by the application name and the widget name, and any widgets which share a widget name, also share any resources generated into the X resource file.
The following lines are taken from X-Designer's own X resource file:
/* dialog buttons */ XDesigner*apply_button.labelString: Apply XDesigner*cancel_button.labelString: Close |
X-Designer has several buttons, in several places, which have the widget name apply_button. All these buttons share the label string "Apply". Similarly, all buttons with the widget name cancel_button share the label string "Close". These strings can be changed on all buttons at once by editing one line of the X resource file.
By contrast, resources generated into the source file are always set separately for each widget, even if widgets share a widget name.
X-Designer allows considerable flexibility in arranging files to suit your preference. This flexibility requires some care on your part, since you must include all necessary pieces of code, yet avoid duplication, in order for your application to link successfully.
Another consideration is that your file setup should allow changes to your interface in X-Designer after the first pass at generating code. Remember that any changes you make will require regenerating code and, possibly, resource files. Your files and directories should be set up so that when you regenerate files you do not overwrite any coding work you have done.
With these considerations in mind, this section discusses strategies for organizing your code files.
It is a good practice to keep a separate directory for each X-Designer application. Make the directory before you start designing. Save your design file and generate all code files and resource files into that directory.
To avoid errors, do all of your own coding outside the primary module and X resource file generated by X-Designer. Code preludes, module preludes (see Customizing the Generated Files: Preludes) and the various options in the Generate dialog give you some control over the primary module from within X-Designer. Similarly, resource preludes let you adjust the X resource file. If you do not edit these files outside X-Designer, you can regenerate them when you make changes in your design without sacrificing any work you have done.
The main() procedure almost always needs to be edited. For this reason it is best to generate a separate main program file. You can then edit this file as you wish. Make sure that you do not regenerate the main program file once you have made your own changes to it. See Setting up the Main Program File for details on how to generate a separate main program file.
Unlike other generated files, the stubs file is meant to be edited. X-Designer will preserve changes to stubs files on re-generation. See Chapter 6 for details on adding, editing and understanding callbacks. See Adding Callback Functionality for details on editing a stubs file.
If your application uses links, you must generate the link functions and function declarations into either the code file or the stubs file.
If your application uses generated code from more than one design file, you should generate the link functions declarations into all the primary modules but generate the link functions into only one file.
If your make procedure involves compiling the primary module and the application code separately, you should turn on the "Include Header File" toggle for the primary source code file. This procedure was followed in the tutorial. See Setting up the Primary Source File for details on how to do this.
Another strategy involves writing a #include directive to include the generated code in your application code file and compile all the code together. If you do this, you should turn on "Include Header File" only once for the primary module and turn it off when you generate the stubs file.
X-Designer lets you edit the primary source file, which it generates, in order to add lines of your own code, here called preludes. All preludes can be entered by typing them into X-Designer and allowing X-Designer to insert them into the code at the appropriate place. There are several types of prelude, distinguished by where the code is inserted.
|
Note - After adding any type of prelude, you should re-generate code in order to see your changes. |
The "Module prelude..." command in the "Module" menu lets you enter a heading prelude, a module prelude and a resource prelude in your code, using the dialog shown in FIGURE 7-8.
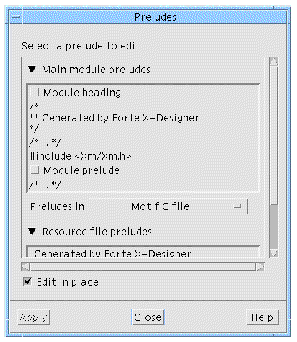
Selecting one of the toggles which appear in the representative text, allows you to edit that type of prelude. There are two ways of adding a code prelude:
Use the "Edit in place" toggle to specify which of the above you wish to use. If the "Edit in place" toggle is set, the generated code is opened for you to add your code. See Using the Edit Mechanism for more details on this.
If the "Edit in place" toggle is not set, a large text widget appears on the right of the dialog. Enter your code here. You should type the code exactly as if you were using a text editor to type any other code. This means that you should observe all the rules and conventions of the target language, including end of line markers, bracketing conventions etc. You should always press Return after the last line in a prelude.
The heading prelude is inserted at the beginning of the main program file, the code file, the externs file and the stubs file. Typically, a module heading would contain a comment with information such as the program name, SCCS ID, or version number.
The module prelude is inserted at the top of the generated code file--just after X-Designer's generated #include statements, if you asked for them. The module prelude can be used to supply #define or #include statements or extern declarations which are needed by your code. The module prelude is generated only into the primary module, not the stubs file.
The resource prelude is inserted at the beginning of the X resource file to specify application resources--i.e. resources which refer to the whole application and not to individual widgets. Use the following syntax:
ApplicationName*resource: value
XDesigner*symbolFont: -*-symbol-medium-r-normal--14*
Although these resource bindings apply to all widgets in the application, they are overridden by more specific resource settings on individual widgets or groups of widgets with a common name.
You may also wish to include comments or SCCS or RCS keywords in a resource prelude.
See Loose Bindings for information on setting up loose resource bindings for the whole module and for individual widgets.
While module preludes apply to the whole module, code preludes apply to individual widgets. This means that the code will be inserted before the widget is created or managed. To add prelude code:
1. Select the widget to which you wish to add code
2. Select "Code Preludes" from the "Widget" menu
The Code Prelude dialog is shown in FIGURE 7-9:
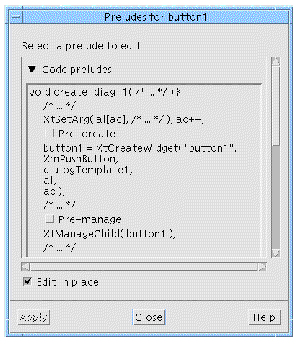
The Code Prelude dialog contains text representing generated code for the selected widget. This code is representative only, so that you can see where the preludes will be added. This is not the actual generated code.
This dialog contains two sections--one for C code (labelled "Code preludes") and one for C++ (labelled "Method preludes"). Within both sections of text are toggles allowing you to choose whether you wish to edit the various kinds of prelude. There are two kinds of code prelude which can be used with C: Pre-create and Pre-manage. These are discussed in Pre-create Preludes and Pre-manage Preludes.
There are three kinds of method preludes for use with C++: public, private and protected. These relate to their access. Method Access Control provides more information on method access. You can, however, add both methods and data members in a prelude. Adding Class Members as a Prelude shows, as part of a tutorial, how to add data members using the Code Prelude dialog.
Clicking over "Code preludes" or "Method preludes" folds away the corresponding text area so that only the other prelude type is visible.
Selecting one of the toggles which appear in the representative text, allows you to edit that type of prelude. There are two ways of adding a code prelude:
Use the "Edit in place" toggle to specify which of the above you wish to use. If the "Edit in place" toggle is set, the generated code is opened for you to add your code. See Using the Edit Mechanism for more details on this.
If the "Edit in place" toggle is not set, a large text widget appears on the right of the dialog. Enter your code here. You should type the pre-creation code exactly as if you were using a text editor to type any other code. This means that you should observe all the rules and conventions of the target language, including end of line markers, bracketing conventions etc.
Pre-create preludes are inserted into the code before the selected widget is created.
If the selected widget is not a Shell widget, the pre-creation prelude is inserted in the creation procedure for the widget's parent Shell and you can provide any code without restriction. Pre-creation preludes are commonly used to set resources which can only be set at widget creation time. Pre-create preludes for Shells are different and are described in Shell Pre-create Prelude. Below is a segment of generated code showing where pre-create preludes are added:
... /* xdesigner: prelude for rowcol1: pre-create >>> */ Enter pre-create code here /* <<< pre-create ends. */ rowcol1 = XmCreateRowColumn ( shell11, "rowcol1", al, ac ); ... |
If you had selected "Edit in place" and you are editing the generated code directly, make sure that your code is typed into the area surrounded by special comments. It is then preserved when you regenerate code. You must not alter or remove the special comments.
The code preludes for a Shell differ slightly from those of other widgets. The pre-creation prelude is used to replace the function header for the Shell's creation procedure. You can then, if you wish, define extra parameters.
The generated body of the procedure refers to one or more variables, which, in the default procedure heading, are passed as parameters. While these variables must be in scope, you can choose to pass them as parameters or declare them as global variables. The following variables must be in scope:
Widget parent;
If you do not provide a pre-create prelude for a Shell widget, the creation procedure name defaults to create_<widget-variable-name> with the compulsory parameters as the only parameters.
|
Note - If you provide a pre-create prelude for a Shell, the call of the creation procedure in the generated default main() program is unlikely to be correct. |
The pre-manage prelude appears slightly later than the pre-create prelude in the generated code--just before the widget's callbacks are added. One use of this prelude is to set up client data for the callbacks. Other uses include setting the value of a Text widget, filling a ScrollingList, adding buttons from a file, or any other dynamic initializations. Below is a segment of generated code showing where pre-manage preludes appear:
If you had selected "Edit in place" and you are editing the generated code directly, make sure that your code is typed into the area surrounded by special comments. It is then preserved when you regenerate code. You must not alter or remove the special comments.
A Shell's pre-manage prelude is inserted just after the local declarations in the procedure. Otherwise it is the same as for other widgets.
In order to allow you to edit the generated code to add a module or code prelude, X-Designer uses the script file xd_edit which is found in:
$XDROOT/lib/scripts
where XDROOT is the install directory of your X-Designer. This file has some pre-configured information for the following editors:
To work out which editor to use, the xd_edit script looks at the value of the environment variable EDITOR first. If that is not set it uses the value of the VISUAL environment variable. If that is also unset, vi is used.
All of these editors, apart from vi, create their own windows. If the editor is vi (or an unsupported editor) the script creates a terminal window, and runs the editor in there. It uses the variable XD_TERM to decide which terminal program to run. If XD_TERM is unset, it uses hpterm on HP-UX and xterm on anything else.
You can add other editors to the xd_edit script. This is explained, along with all the other ways in which the editing mechanism can be configured, in Setting up Callback and Prelude Editing. You are recommended to read this section to check that the editing mechanism is configured to your requirements.
X-Designer opens the selected editor onto the primary source file at the appropriate line for editing the selected prelude type for the selected widget. To edit preludes you must have previously generated a code file. If you have not done so yet, you will be prompted to do so.
Before allowing you to edit the primary source file, X-Designer checks to see whether there have been any changes to the design since the last code file generation. If so, you are asked whether you wish to regenerate the file before editing. You cannot edit the file if you do not regenerate it.
When you regenerate the code file after having added a prelude in place, the Prelude Acceptance Chooser is displayed. This is shown in FIGURE 7-10. Adding a prelude directly into the Preludes dialog will not cause the Prelude Acceptance Chooser to appear.
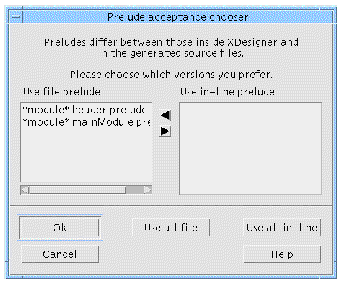
In this dialog, you can choose individual preludes which have changed since the file was last generated and specify whether you wish to accept or reject those preludes. Select the preludes and press the arrow keys to move them from one list to the other. When you press "Ok" only those preludes you chose to accept will be regenerated. Alternatively, you can choose to reject or accept all the newly added preludes. Preludes which you reject are deleted when you "Ok" the dialog and cannot be retrieved at a later date.
Preludes which were added before a previous code generation took place are retained--the Prelude Acceptance Chooser only affects those preludes which have been added since your code file was last generated.
 The terms "Header file" and "Externs file" are used interchangeably in both X-Designer and the User's Guide.
Copyright © 2003, Sun Microsystems, Inc. All rights reserved.