| C H A P T E R 10 |
|
Designing for Java |
This chapter describes the way X-Designer can generate Java code with the option of using the Swing component set, from any design. It is divided into the following sections:
Java is a programming language with elements reminiscent of C and C++ (amongst others). It has libraries specifically geared for the Internet environment. In addition, Java is highly portable, object-oriented and interpreted. It is threaded, has automatic storage management and uses exceptions. If none of this means anything to you, you may like to read the books listed in Books on Java before continuing.
X-Designer can also generate code to use the Swing component set. Swing components use the JFC (Java Foundation Classes) to give a set of components which are independent of the underlying window system. They also feature the "pluggable look and feel" built into the JFC. All of this means that you can create one user interface which can reflect the look and feel of any of the major Java platforms (Windows, Solaris, Macintosh). This look and feel can even be switched at runtime without the need to restart the application. Swing gives your application a consistent interface and platform independence.
The code generated by X-Designer can be in the form of applets or straightforward applications. An applet is a small application which is embedded in a web page and runs when the page is browsed.
The generated Java code is not restricted in any way. That is to say, the code can be taken away and used on any platform supporting Java and used any number of times. Because X-Designer allows you to design on Motif-based platforms regardless of your target platform, the generated code imports a library of classes implementing the mapping of Motif widgets to Java classes. This library is known as MWT and is supplied as part of the X-Designer release. In Java, classes can be grouped together into packages. The MWT is in a package called uk.co.ist.mwt.
Motif Widgets to Java Classes--the MWT Library details the way in which Motif widgets have been mapped to Java classes.
In order to compile and run the generated Java code, you will need a Java compiler and interpreter. If you intend to generate applet code, you will also need either an applet viewer or a HTML browser to view the applet.
To generate Java code from X-Designer, you do not need to set any environment variables other than those you already use for X-Designer. In order to compile and run the generated code, however, you will need to set the CLASSPATH environment variable. This, like the PATH environment variable, is a list of directories. This list must include the directory $XDROOT/lib/java_classes--where XDROOT is the install directory of your X-Designer. It should also include any directory where you have generated class definitions which will be used by your application--for example, the current working directory (.). You should also make sure that the directory containing your Java compiler and interpreter is in your PATH list.
The way X-Designer is used in order to generate Java code bears some resemblance to the way X-Designer is used for the generation of C++ and Microsoft Windows code. This is because Java is a class-based language like C++. The way in which class instantiations, derived classes and methods are handled is the same.
|
Note - If, therefore, you are not familiar with the use of X-Designer for C++, it is strongly recommended that you refer to Chapter 8. |
You can generate Java code for designs containing user-defined widgets. This is detailed in Generating Java Code in Chapter 23. Using the resource file mechanism, the widgets are mapped to Java components. The section mentioned above details how to do this and where to find existing resource files.
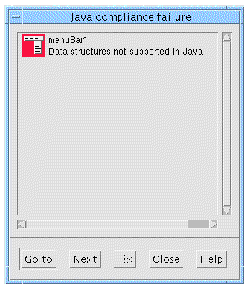
The "Module" menu contains a toggle labelled "Java compliant". Setting this toggle on indicates to X-Designer that you wish your design to be suitable for Java code generation. If your design cannot be reproduced in Java code, the Java Compliance Failure dialog is displayed.
The Java Compliance Failure Dialog lists all aspects of the design which cannot be reproduced in Java code. The dialog is illustrated in FIGURE 10-1.
 [ D ]
[ D ]
The buttons at the bottom of the dialog perform the following functions:
The following is a list of user interface features which cannot be carried over to Java code:
There are some design restrictions which apply specifically to applets. These are:
Widgets in Java designs can be given callbacks in the same way as widgets in any other type of design. Unless the callback is intended to define a listener object (as described in Event Model), the callback should be a method. The method is declared in the enclosing class for the widget. If the widget which has been given the callback is itself a class, then the callback method is declared in the widget's class. If it is not, X-Designer searches up the hierarchy to find the nearest ancestor which is a class and declares the method in the class for that widget.
By default, X-Designer supports Java version 1.4. You may generate code for other versions of Java by selecting the appropriate option in the generate options dialog. This is described in Java Version for Generated Code.
Resources and callbacks are marked to indicate which version (or versions) of Java supports them. A full description is provided in Version Symbols for Resources and Callbacks.
You can find out which version of Java you are using by running java with the "-version" switch. The version is then printed on standard output and Java immediately exits.
The Java Options dialog, shown in FIGURE 10-2, includes a new option menu allowing you to select the Java version for your generated code.
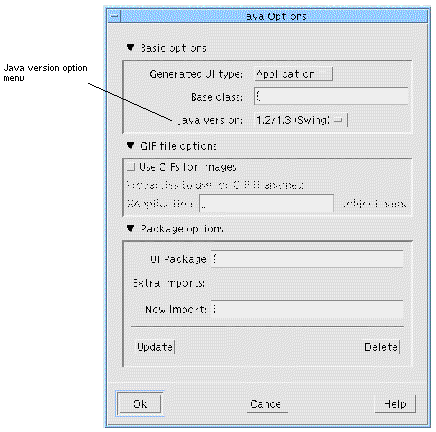
The Java Options dialog is displayed by pressing the button labelled "Java options..." on the Java page of the Generate Overview dialog.
Whichever version was last selected is the version used when code is generated from the command line. If no selection has been made, the default of "Java 1.4" is used.
There are four annotation symbols in the resource panels to show Java support. The coffee cup with the text "1.1" printed over it, as shown in FIGURE 10-3, indicates that the resource is supported in Java 1.1 only.
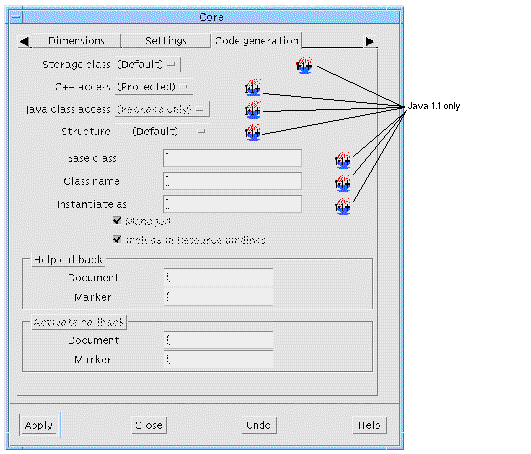
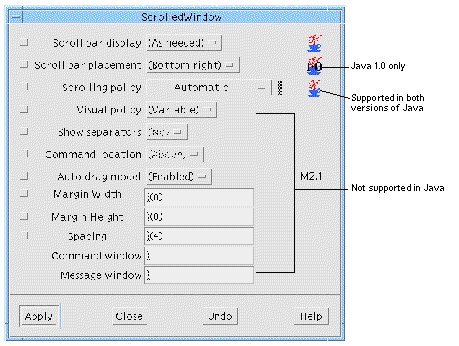
The text "1.0" over the coffee cup, shown in FIGURE 10-4, indicates that the resource is supported in Java 1.0 only. A coffee cup with no text indicates that the resource is supported in both versions of the JDK. The coffee cup with the text "1.2+" over it indicates that the resource is supported in Swing. You can choose between Java 1.2 and 1.3 or Java 1.4 when you generate code. Having no coffee cup indicates that the resource has no Java support.
 [ D ]
[ D ]
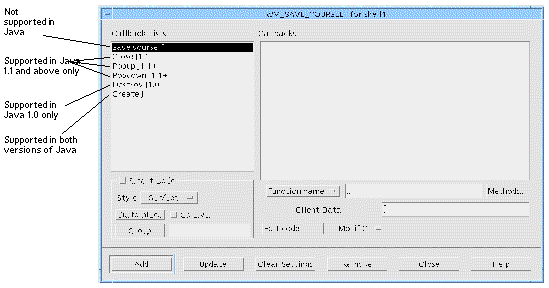
Callbacks in the callbacks dialog are shown with the string "J1.0" to indicate that the callback is supported in Java 1.0 only. The string "J1.1+" indicates that the callback is supported in versions 1.1 and later only. A simple "J" indicates that a callback is supported in both versions. As with resources, no annotation means that the callback is not carried forward into Java. Examples of these annotations are shown in FIGURE 10-5.
The set of Java components and the set of Motif widgets are not the same. This means that two areas need to be covered to resolve the problem of generating Java code from a design built on a Motif-based platform:
In order to address the first issue listed above, the MWT is supplied with X-Designer. This is a library of classes which mimic the Motif widgets. This library is called MWT and is located in $XDROOT/lib/java_classes. The classes in this library have been grouped together into a package which is referred to as uk.co.ist.mwt. All code generated from X-Designer imports this package.
Internally, X-Designer decides which widgets correspond to which Java classes. A full listing of this mapping is provided in Motif Widgets to Java Classes--the MWT Library along with a list of the resources which are relevant to Java code.
To satisfy the second criterion above, the following Java layout classes, which have no counterpart in Motif, are provided as widgets:
There are five new widgets; each one simulates a Java layout manager. The widgets are a part of X-Designer and, as such, appear on the palette. The source code for them is also supplied as a part of the X-Designer release. This can be found in $XDROOT/src/java_widgets (where XDROOT is the install directory of your X-Designer). The directory also contains a file named README which provides more information on the widgets.
The following sub-sections provide information on how to use each of the new Java widgets and the resources associated with them.
The Card widget is a Motif equivalent of the Java CardLayout class. It lays out its children so that they are all the same size as itself with only the topmost child visible. Each child can be given a "page number" and the Card widget can be told to show the child with a specified page number.
A typical use for the Card widget is multi-page dialogs controlled by an Option menu or by "Tab" buttons.
There are three resources associated with the Card widget:
The spacing resources are of type XtRDimension and refer to the spacing around the Card.
The current page resource determines which of the various children of the Card is currently displayed "on top". The resource is of type XtRInt.
Each child of a Card widget has a constraint resource, pageNumber, which allows you to assign a page number to the child widget. This resource is of type XtRShort.
To display any given child, set the Card widget currentPage resource to the pageNumber specified for the child.
There is a convenience function XdCardShowPage(Widget card, int page) defined in the Card widget sources for performing this within your own code.
The Flow Widget is a Motif equivalent of the Java FlowLayout class. It lays out its children in rows from left to right. When a row is full it moves onto a new row i.e. it lays out its children as a word processor lays out words in a paragraph. The rows may be left/right aligned or centred.
There are three resources associated with the Flow widget:
The horizontal and vertical spacing resources are of type XtRDimension. They refer to the gap between the rows and columns of child widgets.
The horizontal alignment resource is of type XdRAlignment and can be set to one of left, center or right.
The resource behaves similarly to the alignment of text in a paragraph.
The Border widget is a Motif equivalent of the Java BorderLayout class. It can accept up to five children, which can be assigned to five positions: north, south, east, west and center, as shown in FIGURE 10-6. The Border widget can have more than five children but the surplus ones are simply added at a default location and not laid out.
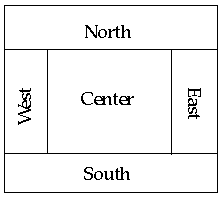
The north and south children expand to fill the width of the Border widget. The west and east children fill the space between the north and south children vertically and the center child fills any space left over. The Border widget makes a good replacement for the MainWindow widget as it does not suffer from many of the MainWindow's problems and peculiarities. Any of the five positions may be left empty.
There are two resources for the Border widget:
Both of these resources are of type XtRDimension and refer to the gap between the children.
Each child of the Border widget has a constraint resource which is the borderAlignment. This is of type XdRBorderAlignment, and can be set to north, south, east, west, or center.
The Grid widget is a Motif equivalent of the Java GridLayout class. The Grid widget makes all its children the same size and lays them out in a grid pattern. The number of columns in the grid is specified by a resource--the number of rows is calculated. Resizing the Grid widget will cause all its children to resize to fit.
There are three resources for the Grid widget:
The horizontal and vertical spacing resources are of type XtRDimension and refer to the gap between the rows and columns of the children.
The numColumns resource is of type XmRShort, and this refers to the number of columns to display in the grid.
The GridBag widget is a Motif equivalent of the Java GridBagLayout class. The GridBag widget is complicated but provides the greatest flexibility of all the Motif and Java layout widgets. The GridBag incorporates the idea of a grid--with widgets in cells laid out in rows and columns. The rows and columns of the GridBag, unlike those of the Grid widget, can be different heights and widths to accommodate the different types of widget. The size of a row or column is determined by the tallest or widest child widget in that row or column respectively. Child widgets can also be expanded to fill any number of rows and columns and can be aligned to a specified geographical location within the cell(s) that they occupy. The GridBag also allows you some control over the way children resize when the GridBag itself is resized. This is explained in Resizing the GridBag.
When children are added to the GridBag, they are placed to the right of the previously added widget. To change their position in the grid, you will need to use the constraints dialog on each individual child widget.
The Constraints dialog for the child of a GridBag is shown in FIGURE 10-7.
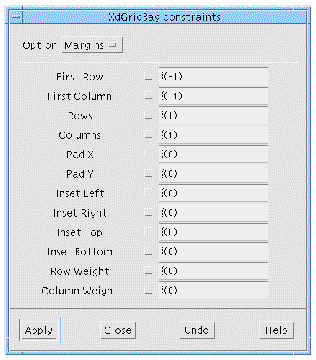
The top of the Constraints dialog shows two option menus. The cellAlignment resource tells the GridBag where the widget should be placed geographically in the group of cells that it occupies--North, South, East, West, NorthEast, NorthWest, SouthEast, SouthWest or Center. The cellFill resource makes the widget resize to fill part or all of the group of cells that it occupies. Selecting Horizontal makes the widget fill all the columns that it occupies, selecting Vertical makes it fill all the rows. Selecting Both makes the widget expand to fill all the rows and columns that it has been given. The None option keeps the widget at its original size at the geographical location specified by the cellAlignment resource.
The row and column resources allow you to tell the GridBag where you wish the selected widget to appear in the grid. The similarly sounding rows and columns resources tell the GridBag how many rows and columns the widget will occupy. The widget does not expand to fill the specified number of rows and columns--that behavior is controlled by the cellFill resource described below. There are two "special" values which can be entered in the rows and columns textbox:
1. A value of 0 (zero) in the columns or rows textbox indicates that the widget should occupy all columns or rows respectively from its current position to the edge.
2. A value of -1 (minus one) in the column or row textbox indicates that the widget should remain vertically or horizontally next to the previously added widget, respectively.
The rowWeight and columnWeight resources refer to the resize policy and are explained in Resizing the GridBag.
The padX and padY resources specify internal padding to add on each side of the component horizontally and vertically respectively.
The inset resources (insetLeft, insetRight, insetTop and insetBottom) specify the margins to appear on each side of the selected widget.
The Constraints dialog for the children of a GridBag contains the rowWeight and columnWeight resources. These resources affect the way the rows and columns will resize when the GridBag is resized.
Although each widget child of a GridBag can be given a rowWeight and a columnWeight, the GridBag searches for the highest number in each row and column and uses that number for its calculations for the whole row or column. For this reason there is no need to set a weight on every widget, just one in each row and column.
The easiest way to describe the effect of setting row and column weights is through examples.
This first illustration considers rowWeights. Imagine that you have set row weights as shown in FIGURE 10-8. The top row has a highest rowWeight setting of 3, the middle 2 and the bottom row 1. These "highest" settings are the only ones that matter--we can now ignore the other rowWeights in each row.
The GridBag now calculates the sum of all rowWeights--in our case, this is 6. Now imagine that the GridBag is stretched downwards. Any extra space is allocated to the rows as follows:
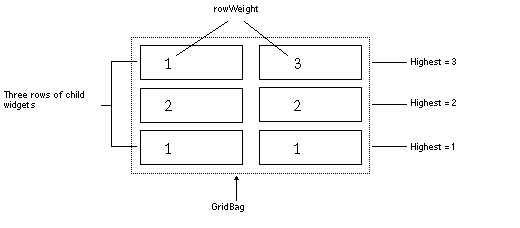
The GridBag calculates how to resize its columns in the same way as it calculates the rows, explained above. Imagine a GridBag containing widgets which have been given columnWeights as illustrated in FIGURE 10-9. This is the same illustration as that shown in FIGURE 10-8 except that the figures now refer to columnWeight instead of rowWeight. The highest columnWeight value in the left column is 2 and the highest value in the column on the right is 3. The GridBag is only interested in the highest figure in each column and ignores any other columnWeights that you may have set. The sum of these "highest" columnWeights is 5. With all of these figures, the GridBag can perform some percentage calculations when there is extra space available.
Now imagine that the GridBag depicted is stretched outwards to the right. It allocates the extra space to its columns as follows:
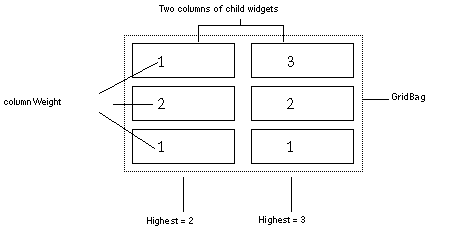
There are two resources for the GridBag widget:
Both of these resources are of type XmRInt and refer to the gap between the rows and columns.
The event model (the way messages are passed between objects) changed between versions 1.0 and 1.1 of Java. If you select "Java 1.1" as the version to generate, the new event handling mechanism is used.
Whichever mechanism is being used, if you have registered a callback method (as opposed to a function), your method is called when the event is triggered. The main difference between the two versions is in the way callback functions are handled.
If you generate Java 1.0 code, all callback functions are ignored. They are not generated. Java deals with classes and therefore only supports the concept of methods.
When generating Java 1.1 code, however, your callback functions are treated as calls to an external listener object which can be generated by X-Designer. This means that if you are moving from C++ to Java and your code uses functions, you can generate Java 1.1 code and maintain equivalent behavior.
|
Note - The buttons in a Java File Selection Box do not fire events when pressed. For this reason, links from a File Selection Box will not work in the generated Java code. |
When generating code for Java 1.1, X-Designer interprets callbacks which have been defined as functions (as opposed to methods) as listener objects. A listener object is an instance of a class which implements an interface between an action occurring in the user interface front end and the rest of the application. These are also called "helper" and "adapter" classes.
X-Designer can follow one of two strategies when generating listener objects from callback functions. This is controlled by the following resource:
XDesigner*javaWrapFunctions:true
The default is "true". This causes X-Designer to generate a wrapper object, as explained in the following subsection. Set this resource to "false" if you wish to handle the listener object code yourself, as described in Controlling Listener Objects Yourself.
When Java 1.1 is generated, callback functions are treated as references to listener objects. A callback object is generated into its own file using the name of the function with "callback" appended. If, for example, you have a callback function named "myFunction", the following class is generated in a separate file called myFunctionCallback.java:
The file is only generated if it does not already exist. You can safely add to it because this file is not overwritten.
There is only one instance of each callback's object. If you have added the same callback function to a number of different widgets, they will share the one callback object by calling a get() method which returns the single instance. The object is created the first time get() is called.
The callback object has a doit() method which is similar to a standard callback stub--this is where you add your own code. The doit() method is called from the listener object in the enclosing class of the object with the defined function. The context object and the event itself are passed into the doit() method. For example:
This is the default behavior. Changing the javaWrapFunctions resource to "false" results in the behavior described in the following section.
If the javaWrapFunctions resource is set to "false", none of the callback object code described above is generated. In the example of the Activate callback on a button, the following is generated into the enclosing class:
Where "button1" is the name of the widget which has a callback function defined for it and "myFunction" is the name of the callback function.
The code as generated is intentionally incomplete; it will not compile as it is. There are two pieces of code which you need to add:
1. The declaration of the listener object "myFunction".
2. The definition of the class of which "myFunction" is an instance.
The first piece of code is relatively simple. It would look like this:
EventListener myFunction = new EventListener();
This declares the listener object "myFunction" as an instance of the class "EventListener" which is a class that you are about to define.
The second piece of code is a little more complex:
This is the definition of the new EventListener class. The method "actionPerformed" is called when an event occurs in button1. You may wish to define classes like this in their own file with "public" access so that they may be used by any component. You will then need to make sure that you can access the component (in this case "button1").
|
Note - Only callbacks which are marked as Java compliant in the Callbacks dialog are generated. Those without the Java mark in the Callback List are ignored when Java code is generated. |
Selecting "Event Handlers..." from the Widget menu, when you have a widget selected, displays the Event Handlers dialog which is described in Event Handlers. Any procedures added here are treated the same as callback functions when Java code is generated if you have specified Java-compliant event masks. Event masks which are not Java-compliant are ignored when Java code is generated.
X-Designer assumes that you have a listener object with the name given for the procedure, in the same way it does for callback functions. X-Designer registers the listener object for each Java event type corresponding to each X event mask. For example, FIGURE 10-10 shows an event handler with the following event mask:
PointerMotionMask | KeyReleaseMask | EnterWindowMask
for a procedure called "exampleHandler" on a widget named "MyButton".
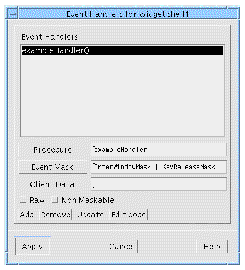
For such an event handler, X-Designer would generate the following Java code:
if ( MyHandler != null ) MyButton.addMouseMotionListener( myHandler ); if ( MyHandler != null ) MyButton.addKeyListener( myHandler ); if ( MyHandler != null ) MyButton.addMouseListener( myHandler ); |
You would then be expected to add a line to the generated code file declaring that myHandler is an instance of a class defined elsewhere, for example:
MyHandler myHandler = new MyHandler();
To compile this code, you would need to define the class MyHandler. This class would have the following signature (it could also be "public" if so required):
The MyHandler class would contain definitions of all the methods of the three listener classes.
Callback methods for Java 1.0 have the signature:
void foo( Event x )
and for Java 1.1, they have the signature:
void foo( AWTEvent x )
The result of this is that if you generate a new Java 1.1 file on top of an existing Java 1.0 one, new stubs are generated for all of your callback methods. The old ones are, of course, retained, but they are no longer the methods which will be called. When upgrading your design from Java 1.0 to Java 1.1, you should move any code from the old methods to the new, adapting any code which uses the event objects.
The Generate Dialog is quite different when "Java" is selected from the Language option menu. A list of files which can be generated is displayed, as shown in FIGURE 10-11.
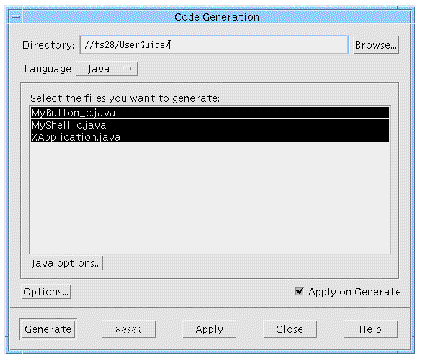
The text box labelled "Directory" shows where the files will be generated. To change this either type the name of the directory directly into the text box or press the "Browse" button and use the File Selection dialog.
Only files which are selected (or highlighted) will be generated. To select or deselect a file, click over it. Use the Shift key modifier to extend the selection list and the Control key modifier to add individual files to the selection. For more details on the files listed in this dialog, see Java Files. Using the Generated Files explains how to compile and run the generated code.
The button labelled "Java Options" displays a dialog containing options which are relevant to Java code generation, as shown in FIGURE 10-12. For a description of the Code Options dialog, which is produced when the button labelled "Options" is pressed, see Code Generation Options.
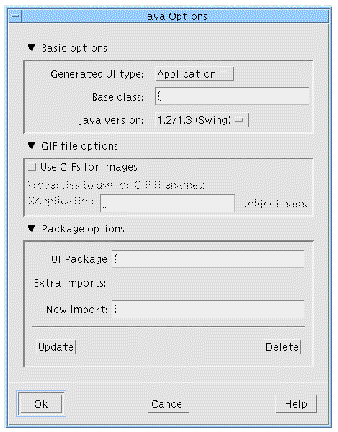
The Java Generation Options Dialog allows you to control the following five areas associated with Java code generation:
By default, X-Designer will generate an application from your design. If you prefer to generate an applet, select the appropriate option from the option menu. If you select "Applet", the generated main code file will contain extra code to allow the application to run inside an HTML browser.
The main code file contains one class which, effectively, links together your design. The name of this class is whatever you have specified as the application class in the Code Options dialog (or XApplication by default). This can be extended from another class by typing its name in the text box labelled "Base class". If you are generating an application and you do not specify a base class, the application class is not extended. If you are generating an applet and you have not specified a base class, the Java class "Applet" is used by default.
The GIF options section of the dialog takes on one of two forms, depending on whether you are generating an application or an applet. In both cases, there is a toggle labelled "Use GIFs for images" at the top of the section. If this toggle is not selected, the rest of the section is insensitive. When it is selected and you are generating an application, the code generated for pixmap objects assumes that all of the pixmaps are stored in separate GIF file. When the "Use GIFs for images" toggle is not set, the pixmap objects are stored in a file named <ApplicationClassName>PixmapObjects.java as arrays of integers. When the "Use GIFs for images" toggle is set, that file contains code to load the GIF files. Also in this case, an extra file is added to the list of Java code files. This is the property file and is named <ApplicationClassName>Properties. In this file, the GIFs are referenced as follows:
<ApplicationClassName>.<ApplicationImagesName>.<PixmapObjectName>
where "ApplicationImagesName" is the value entered into the text field in the GIFs options section of this dialog. For example, if you are using the default application class name, XApplication, and you have created a pixmap object named "TreeIcon" and you have entered the value "MyApplicationImages" into the text field, then the property name for the TreeIcon pixmap would be:
XApplication.MyApplicationImages.TreeIcon
and if you had another pixmap object, this time named "LeafIcon", the property name would be:
XApplication.MyApplicationImages.LeafIcon
If you are generating an applet and you have set the "Use GIFs for images" toggle, the GIFs section of the dialog contains a text box which allows you to specify a directory (relative to the document base) where the GIF images can be found.
If you wish to use GIFs in your application or applet, you will need to create the GIF files. X-Designer provides some help by allowing you to generate XPM files for all your pixmap objects in one go. To do this, go to the "Pixmaps" page of the Generate Dialog. This contains a list of the pixmap objects in your design. Pressing "Generate" creates a XPM file for each object giving it the name <PixmapObjectName>.xpm. You can choose whether you wish to generate XPM2 or XPM3 format. Once you have generated the XPM files, you will need to convert them to GIF using a conversion utility. There are a number of freely distributed conversion utilities available including pbmplus and netpbm.
The last section of the Java Generation Options Dialog contains a text area where you can specify the name of a package. A package is a group of classes that are bundled together. If you choose to generate your classes as a package, your main code file will contain a statement to import it.
|
Note - There are some conventions which should be followed in the naming and organizing of packages. Your Java documentation will have more details on this. |
Java code differs substantially from C or C++ code in its structure. All code in Java must be contained within a class. Each separate class must be contained within its own file. The "main" procedure is a method of the application class. The Java interpreter will locate this method and start the application.
In the generate dialog, when "Java" is selected from the menu of language flavors, a selectable list of files is shown. Depending on the structure of your design, these will be as follows (names in angle brackets indicate a variable name according to the names you have used in the design):
For generating Java code from the command line, an extra flag has been added to X-Designer. The flag is `-J'.
The code generated by X-Designer for the hierarchy and design shown in FIGURE 10-13 is listed below. To generate the code yourself, follow these steps:
3. Make "MyShell" a Session Shell.
This is done in the Shell resource panel.
4. Add the DialogTemplate to the Shell.
5. Name the DialogTemplate "MyMessageBox".
6. Select three PushButtons and a Form widget.
7. Select a ScrolledText as the child of the Form.
8. Name the ScrolledText "MyScrolledText".
9. Select the ScrolledText, press the right mouse button and select "Make class" from the menu which is displayed.
This is a quick way of changing the structure of the selected widget. Alternatively, you could display the Core Resource panel, go to the "Code Generation" page and change the "Structure" option menu to "C++/Java class".
You should now have the hierarchy shown in FIGURE 10-13.
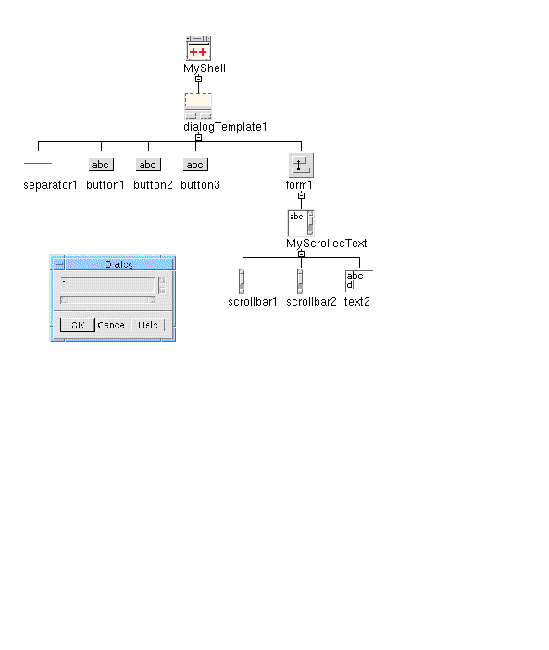
This simple design has no resources set as we are only interested in the code which is generated from it. In the generate dialog, when "Java" is selected, we are offered the files shown in FIGURE 10-14.
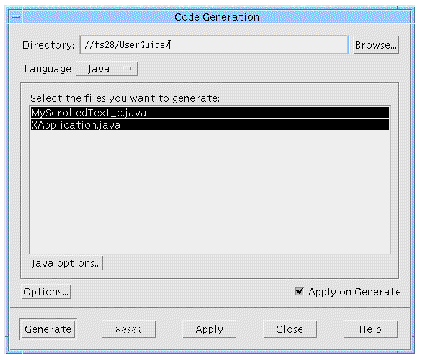
Because we have not specified an application class name, the default (XApplication) is used in the filenames. You will need the file XApplication.java as this is the main entry point for the application and you will also need the file MyScrolledText_c.java as this is the class definition of the ScrolledText widget. So, what you should do breaks down as follows:
10. Make sure that XApplication.java and MyScrolledText_c.java are both selected.
11. Check the "Directory" shown at the top of the dialog. The files will be generated there so change it as necessary.
Below is a listing of the file XApplication.java:
Now, this is MyScrolledText_c.java:
These files can be taken away and used in any way you see fit. The only caveat is the inclusion of the MWT. The line:
import uk.co.ist.mwt.*;
imports into your Java program all of the Java class library provided with X-Designer. This means that if you wish to take the generated files to a different platform and run the resulting application there, you will need to take the Java class library, MWT, as well.
Once you have your Java code files you are free to use it on any platform which supports Java as long as you have the MWT library on that platform. Follow these steps to build a Java application from your generated files:
1. Make sure that your CLASSPATH environment variable is set as explained in Requirements.
2. Make sure that the directory containing any classes you have just generated is included in the CLASSPATH list.
This may be your current working directory, in which case you should check that . (dot) is in the CLASSPATH list.
3. Make sure that your PATH environment variable includes the directory containing your Java compiler.
4. Type: javac <ApplicationName>.java
This will give you a file <ApplicationName> with a .class extension.
5. Type: java <ApplicationName>
Your Java application should appear on the screen.
All code in a Java code file must appear within a class. This means that the callback stubs are generated as part of the class to which they belong. There is no separate callback file as there is with other flavors. This is not a problem, however, because all code added to the generated code is retained as long as the new code is outside of the guard comments. This subject is explained in the following section, Retaining Edits.
The sample code above contains the following section:
This section contains a number of comments and illustrates how comments are used to retain any code you add. The first comment is for your information only. The second and third, however, are special. Any comment which begins "// Private: ..."--do not edit" indicates that the following lines must be left as they are. There is a corresponding "//Private: ... ends" which indicates the end of a section to be left untouched.
Any code or comment that you add outside of the special comments detailed above, will be retained when the file is regenerated. This means, for example, that you can add code to callback methods which will always remain.
Along with the Java compiler and interpreter you also have javadoc, an automatic documentation tool. Javadoc looks at .java files, parses the declarations and comments beginning with "/**" and produces HTML pages detailing the chain of class inheritance and all the public fields in a class along with any extra information contained in the special comments. The special comment mechanism is there for you to add to the documentation that javadoc creates. Code generated by X-Designer includes some basic information for Javadoc.
X-Designer allows you to import your X-Designer designs into Visaj, the Java development tool. This gives you the ability to move your legacy Motif C/C++ designs quickly to Java.
You can, of course, use X-Designer's Java code generation facility to convert your design to Java. This would allow you to maintain a common code base covering Java, C/C++ for Motif and MFC for Microsoft Windows. If, however, you intend to use Java only, you may wish to move on to Visaj, IST's visual application builder for Java.
Moving your design from X-Designer to Visaj is simple and involves only the following steps:
This section describes how to achieve this from both sides--X-Designer and Visaj. The section ends with some troubleshooting hints.
To save a file for Visaj, select `Save as...' from the File menu and then select `Visaj bridge format' from the `Save format' option menu.
Specify a filename and press "OK". This name will not be used as the default filename for your design.
If the design is not Java 1.1-compliant, the compliance dialog appears. This is the same dialog displayed when you generate Java from a non-compliant design. Fix the errors and try saving again.
As the file is generated, windows may flash up on the screen.
The Import pullright menu in the File menu contains the item "X-Designer bridge file". When this is selected, a file dialog appears. Type the name of the file saved from X-Designer.
If you have used a feature in X-Designer which has no equivalent in the version of Visaj which you are using, a dialog is displayed describing what has been found. The possible items in this dialog are as follows:
In X-Designer, you can make any component a class. In Visaj, classes are separate hierarchies in different designs. To use them together in a design:
1. Generate code for each class.
3. Add the compiled classes to the palette as beans.
4. Use the newly added beans in a larger design.
This method of conversion from X-Designer to Visaj allows you greater control of the way classes are used than if X-Designer made those decisions for you.
While importing, Visaj "expands" classes. You can, of course, refine this by cutting subhierarchies and pasting them into new Visaj designs after importing the design.
Visaj supports one frame per class. If your design contains multiple session, application or top-level shells, it is converted into several Visaj class files--one for each shell.
Dialogs, by contrast, are all reparented to the main application shell (or a top-level shell if there is no main application shell). However, if there is no application shell and there are no top-level shells, but if there are multiple dialogs, then each dialog is placed into its own class.
Visaj has no equivalent to these objects, so all references to objects are expanded into simple resource values. For example, if you have a label myLabel whose text is <myObject>, where <myObject> is a string object with the value "Hello", then after import, myLabel has the text "Hello", and <myObject> is no longer used.
In Visaj, there is no layout manager com.pacist.mwt.FormLayoutManager. Components whose layout is controlled by this manager are positioned absolutely as a result.
|
Note - You are recommended to change your design to use one of the Java layout managers. |
Once imported into Visaj, your design reflects exactly the Motif design in X-Designer. This is the same as if you had generated Java code directly except that, with Visaj, you can continue your Java application development.
You may design your application user interface using X-Designer on a Motif-based application and then generate both C/C++ code for Motif and Java code. X-Designer allows you to do this by providing a library of Java classes, called the MWT, which map Motif widgets to Java classes. Some Motif widgets have a direct counterpart in Java, others do not. Where there is no clear mapping, the MWT library attempts to mimic the Motif widget using available Java classes. The following table lists the Motif widgets available on X-Designer's widget palette and show which Java or MWT class is being used in the Java code generated.
Note that if you are generating Swing, X-Designer tries to map the Motif widgets to Swing components and if it cannot, uses a separate MWT library specifically for Swing components. This is detailed in the following section, Mapping Motif Widgets to Swing Components.
When you generate your Motif design as Java code using Swing components, X-Designer tries to map each Motif widget in your design to a Swing component. If no clear counterpart can be found, X-Designer uses its own MWT library to "mimic" a Swing component and generate code for the widget. The table below illustrates how each Motif widget is mapped.
Copyright © 2003, Sun Microsystems, Inc. All rights reserved.