| C H A P T E R 17 |
|
Thin Client Smart Code |
Motif and MFC applications are traditionally large scale applications. Modern Internet technologies encourage the thin client approach. This is an application structure with a clean division between:
|
Note - The server application generated by default by X-Designer is a CGI program using a Web server to communicate with the client. |
This chapter describes how X-Designer helps you to migrate, very simply, from a large scale application to the structure described above. This is achieved by first "grouping together" widgets to create portable data structures, then "enhancing" your callbacks so that they can either run remotely or communicate with a remote server. There are no other changes you need to make to your design.
X-Designer also lets you try out the connection between the client and the server dynamically before you generate code. Setting the "Go Live!" toggle for a thin client or Internet callback activates that callback by connecting to the specified URL. This is described in Going Live.
You will need to understand how to use both Groups and Get/Set Smart Code in order to use the thin client (or Internet) Smart Code because Groups, along with their getters and setters, are the nuts and bolts of all types of Smart Code. Information on these subjects is found in:
Creating a thin client and server application from your design is done by setting up a special Smart Code callback. To do this, you only need to do the following:
1. Display the Callbacks dialog for a widget in your design.
2. Select the "Smart Code" toggle.
3. Choose "Thin Client" from the Smart Code option menu.
What a Group is, and how to create one, is described in Chapter 15.
Smart Code gives your callback toolkit-independence, not language independence. You still choose the language you wish to generate. Smart Code is simply a layer of code which "wraps up" the widgets in a Group using the specified language.
There are three types of Smart Code:
Both "Thin Client" and "Internet" Smart Code styles require the name of a Group to be passed to the callback. The Group gives the callback access to data in the user interface, even though the callback may be running in a remote server. Either type the name of the Group directly into the "Group" text field or press the "Group" button. This displays the Group Editor. Select the Group you require and press "Apply" to both dismiss the Editor and place the name of the Group into the text field.
All of the stubs generated by X-Designer when either "Thin Client" or "Internet" is selected, have full use of the "getter" and "setter" routines for the specified Group. The Get/Set Smart Code is described in Chapter 16. The callback in a server has a slightly different access to the Group components. It calls a single get or set routine which accesses a default "value". This "value" differs according to the type of widget. For example, a text field has a string value (its contents) and a toggle has a boolean value (its state).
X-Designer Selecting "Thin Client" or "Internet" from the Smart Code "Style" option menu in the Callbacks dialog enables the "Customize" button. This button displays the Customize dialog, allowing you to configure how data is sent to and received from the server. X-Designer does provide sensible defaults. You will always have to change the URL address of the server with which you are communicating, however.
The Customize dialog appears slightly different according to whether it is displayed with "Thin Client" or "Internet" selected from the option menu. The only difference is the label for the Send custom data handler text box. This is because X-Designer uses a different HTTP method for the two types of application. When "Thin Client" is selected, X-Designer uses the POST protocol. By default, X-Designer uses the GET protocol when "Internet" is selected because it is assumed that you are only fetching web pages. You can change this to use POST by providing a custom Send data handler. More about this is given in Custom Data Handlers.
The Customize dialog is explained in Customizing the Server Connection.
See Thin Client/Internet Generated Code for details of the code that is generated when a server callback is defined, including a list of the stubs files.
The "Go Live!" toggle becomes sensitive when a thin client or internet callback has been defined. Setting the toggle enables you to test the connection between the client and the server from within X-Designer, before generating code. Detailed information on this is given in Going Live.
Both thin client and Internet Smart Code styles use the standards of the World Wide Web as the means of communication between the generated client application and a server. In order to run the generated and compiled applications and to use the "Go Live" feature, you will need:
If you need more information on this, consult your systems administrator or contact your X-Designer supplier.
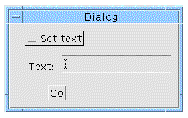
This simple tutorial gives you the chance to try out the "Thin Client" style of Smart Code. By following these steps you will quickly generate a thin client containing the user interface shown in FIGURE 17-1 and a server which sets the contents of the text field according to whether or not the toggle is set. The server can run remotely on your own intranet or anywhere on the Web.
The initial steps are covered only briefly as it is assumed that you are already familiar with the general use of X-Designer. If you are not, you may wish to try the main X-Designer tutorial which starts in .
 [ D ]
[ D ]
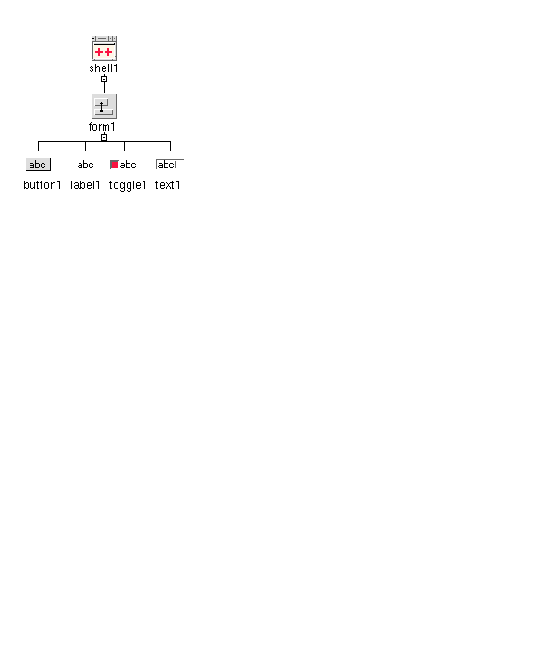
2. Create a simple hierarchy: session shell->form->button, label, toggle, text field.
This is shown in FIGURE 17-2.
3. Label the button "Go", the toggle "Set text" and the label "Text:".
4. Give the shell the title "Tutorial Example".
Do this in the shell's resources dialog.
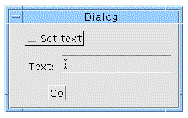
5. Display the Form Layout Editor and lay out the widgets so that they look roughly as shown in FIGURE 17-3.
This is a purely cosmetic change. It affects only the appearance and has no impact on the function of the application.
6. Make the toggle and the text field a Group called "MyGroup".
If you can't remember how to do this, see Creating a Group.
|
Tip - There is a lot more information about Groups in Chapter 15. The Get/Set Tutorial is a simple example which shows you how to create and use a Group. |
7. Select the button and display the Callbacks dialog.
8. Type "doGoButton" into the function name text box.
This callback will, in effect, move to the server-side of your application.
9. Set the Smart Code toggle button.
10. Change the Smart Code style to "Thin Client".
When you do this, the "Customize" button is enabled.
|
Tip - Much more detail concerning the use and meaning of "Thin Client" is given in Thin Client Server Callbacks. |
11. Press the "Customize" button to display the Customize dialog.
The dialog is shown in FIGURE 17-4.
|
Tip - The various fields in the Customize dialog are described in Customizing the Server Connection. |
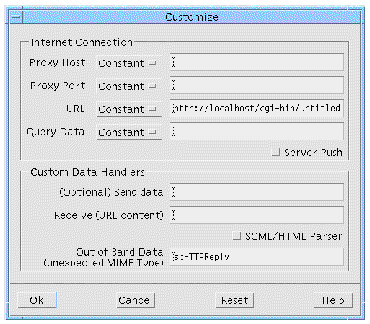
12. If you are behind a firewall, fill out the proxy and port fields.
If you are not sure about this, check with your system administrator or see how your web browser is configured.
|
Tip - More on Proxies lists ways of finding out what your proxy is. |
13. Make sure that the URL field refers to the name and location of your server program.
http://localhost/cgi-bin/untitled
would refer to a server named "untitled" located in the "cgi-bin" directory of your intranet. Following this tutorial, your server application will be called "tutorial" so you should use this name here--simply change "untitled" to "tutorial". "cgi-bin" is a standard directory name, "localhost", however, should be changed to the name of your intranet.
|
Note - In order to work out where to put your server on your filesystem, check the way your Web server has been configured with respect to the physical location of the "cgi-bin" area of the server. |
14. Press "Ok" in the Customize dialog.
For this tutorial, we are going to use the default data handlers so we do not need to change them. Pressing "Ok" closes the dialog.
15. Back in the Callbacks dialog, press the "Group" button and select "MyGroup" from the Group Editor.
You can type the name of the group directly into the text box, but selecting it from the Group Editor avoids typing mistakes.
16. Press "Add" to add your "doGoButton" function to the list of callbacks.
17. Close the Callbacks dialog.
18. Save your design as tutorial.xd.
It is good practice to save your design periodically.
19. Display the Generate dialog by selecting "Generate" from the Generate menu.
20. Choose "C" from the Language menu.
21. Choose a target directory for your files.
22. Make sure that the "Stubs", "Code", "Externs", "Main program" and "Makefile" generate toggles are set.
The "Stubs" file is not selected by default, so make sure it is set before generating.
23. Press the "Options" button at the bottom of the Generate dialog to display the Code Options dialog.
Do not confuse this with the Primary Source File Options Dialog which is displayed when pressing the "Options" button next to the "Code" file.
24. In the Code Options dialog, change the "Strings" option menu to "Code".
By default, this is set to "Resources". For this simple tutorial, it is easier to generate the strings (which is all the labels you have set) into the code. This affects only the appearance of the final dialog.
25. Press "Ok" in the Code Options dialog to save your change and dismiss the dialog.
26. Back in the Generate dialog, press "Generate".
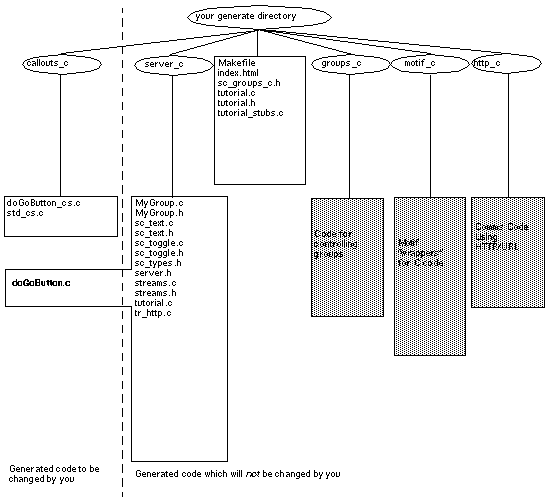
As well as generating the main code files, Makefile and HTML index in the top-level directory, X-Designer also generates the following sub-directories:
FIGURE 17-5 shows all the files generated. The files containing stubs are highlighted.
 [ D ]
[ D ]
The rest of this stage of the tutorial takes place outside of X-Designer. You can exit X-Designer if you wish.
Of the generated files, there are three you need to know more about. These are:
|
Tip - Generated Code contains more information on the code generated by X-Designer for thin client and Internet Smart Code. |
28. Edit the file doGoButton.c in the "server_c" directory.
This contains the Smart Code callback stub. You need to add code here to make the server perform its function.
29. Change the method "doGoButton_callback" so that it contains the lines indicated below:
30. Make sure you have the environment variable XDROOT set to X-Designer's install directory and your C compiler is in your PATH.
See the Generating Code chapter in the main User Guide for more information on setting up prior to compiling.
31. At the command prompt, type make to build the client application and make server to build the server application.
You can take the entire "server_c" directory somewhere else to compile. Take a copy of the Makefile too. The Makefile assumes that the directory "server_c" is beneath it.
32. Move the server application (named tutorial in the server_c directory) to the location named in the URL field, as in XD/Replay.
33. Try running the client application (named tutorial in the generate directory).
Press the button both with and without the toggle set. A message is displayed in the text box. This message is produced by the server, which is checking the value of the toggle first. Although this is a simple example, it demonstrates a structure which can easily be expanded.
Having completed this tutorial, you may like to try some more advanced features of thin client and Internet Smart Code. Provided as part of your X-Designer package are HTML files containing instructions for running supplied XD/Replay scripts which run the tutorials for you. You simply watch it running and then examine the results. Open the following files in an HTML browser:
1. $XDROOT/lib/locale/<YourLocale>/sc/timex.html. This describes the "Server Push" tutorial, demonstrating how to create an application with automatic remote update.
2. $XDROOT/lib/locale/<YourLocale>/sc/parseex.html. This describes how to create an application which fetches a Web page and then parses it.
|
Note - XDROOT is the install directory of your X-Designer and "YourLocale" is the name of the locale you are using. |
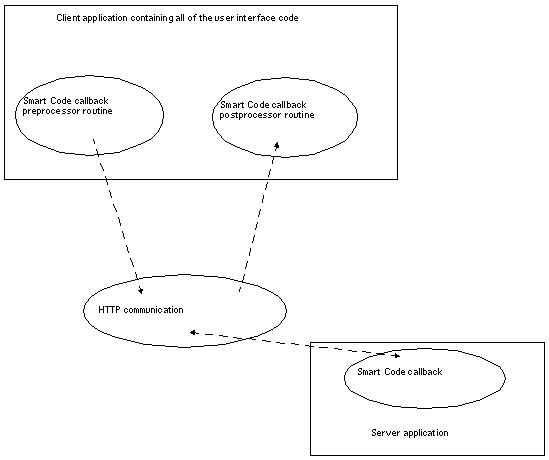
When you generate code from a design containing a "Thin Client" Smart Code callback, X-Designer divides the generated code into a thin client application containing all the user interface code and a server containing the Smart Code callback. This server is a CGI script and therefore uses the standards of the World Wide Web as its means of communication. The code for communicating between the client and the server, using HTTP, is generated too.
FIGURE 17-6 gives a diagram of the structure of the application X-Designer generates when "Thin Client" callbacks are defined. In addition to the Smart Code callback in the server, stubs are generated on the client side of the application to allow you to do any necessary operations immediately before and after data is sent to the server.
The Smart Code callback residing in the server has a handle to a Group. This is the Group specified when the callback was defined. The Group provides a means of passing data between the client and server and gives the server some access to the interface components.
 [ D ]
[ D ]
The server application generated by X-Designer when thin client Smart Code is requested, is a CGI script. This means that it is a program, which can be written in any language (or shell script), which is accessed by means of the HTTP standard. The URL of your server application is passed from the client application to your Web server which then launches your server application. Output from the server application is returned to the client. The server application is generated in the language you request in the Generate dialog.
If you do not have a running Web server, your client and server applications will not be able to communicate. The Internet Smart Code also assumes that you have a Web server up and running in order to access Web pages on the Internet. Contact your Sun Studio supplier for information about Sun's Web server products or visit Sun's Web page at http://www.sun.com. There are a number of freely available Web servers available on the Internet; you should be able to locate one with a quick Web search.
Pressing the "Customize" button for "Thin Client" or "Internet" Smart Code styles in the Callbacks dialog displays the Customize dialog shown in FIGURE 17-7.
This dialog allows you to specify how data is sent to and received from the server. There are two main areas in this dialog:
These are described in separate sections below.
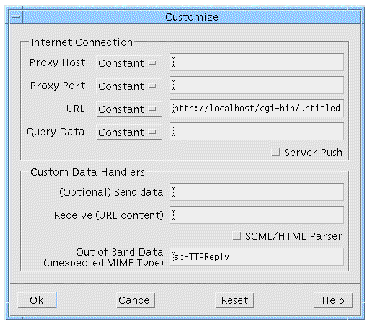
X-Designer uses the information in this section to generate code to establish a link across a network. The fields in this dialog are:
|
Note - If you are not sure what values to set for proxies, see More on Proxies. |
URLs are part of the established World Wide Web protocol.
The URL library used by, and supplied with, X-Designer has been modeled on the Java URL and URLConnection classes in order to facilitate the transition to Java and to maintain a common interface whether you are using C, C++ or Java. This library is available for your use, should you wish to maintain full control over the connection between client and server. The programming interface for the URL library is described in the files reached from symbolic links inside the generated index.html file. This file is found in your generate directory, as described in HTML Files.
If you have not yet generated code, open the following file in a HTML browser:
$XDROOT/lib/locale/<your_locale>/sc/URL.html
where XDROOT is the install directory of your X-Designer and <your_locale> is the name of the locale you are using. If you are unsure about your locale, try typing locale into a terminal window. This prints out your locale information. Use the string assigned to LANG. Example locales are:
A network proxy is a conduit linking your computer (or your Intranet) to the Internet through a firewall. A firewall is a "security screen" which prevents unauthorized access to your computer from the outside world. In order to connect to the internet from behind a firewall, you will have to specify a proxy host and a proxy port. If you don't already know what these are, you could try the following options:
Somewhere in your Web browser, under "Options" or "Preferences" or "Configuration", there will be a dialog where you can specify your network preferences. This dialog allows you to tell the browser whether or not it needs to use a proxy and, if so, what it is. There are a number of options here:
"Proxy Host", "Proxy Port", "URL" and "Query Data" each have a corresponding option menu allowing you to define whether the value you enter is a "Constant", "Variable" or "Function". As its name suggests, a constant simply retains the value typed. Selecting "Variable" causes X-Designer to declare an external variable with the specified name. You should define the variable in your own code.
Selecting "Function" causes X-Designer to generate a file in the "callouts" sub-directory using the name of the function as the filename. This file contains two functions: a "get" and a "set". These routines contain a commented spaceholder where you should insert your own code for getting and setting the proxy host.
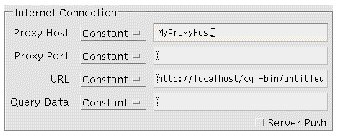
For example, FIGURE 17-8 shows a proxy host defined as a function called "MyProxyHost". Assuming C code, X-Designer would generate the following two routines in the file named MyProxyHost.c:
The comments indicate where you should add code to get and set the proxy host. You may, for example, have defined a form in your user interface which allows a user to enter a proxy host into a text field. You might then get the contents of the text field and assign it to the MyProxyHost_value shown above.
The bibliography lists books which you may find useful in connection with networking and protocols.
The section of the Customize dialog labelled "Custom Data Handlers" gives you the option of overriding the following default routines:
Leaving an empty text box for the Send or Receive handlers causes X-Designer to generate a default routine. For Out of Band Data, the name of the default routine appears in the text box. These defaults provide basic functionality, allowing you to create a working client-server application without immediately having to provide your own handlers. The following sub-sections describe briefly what the default routines give you as well as information to help you write your own.
By default, X-Designer generates a routine which sends data to the server. This routine does the following:
If you have specified a send handler in the Customize dialog, the routine described above will not be called. Instead, your routine is called. Your routine is defined as returning an integer. It takes two parameters, in the following order:
All of the communication protocol remains in place when you override the send routine--it is only the sending of data which is replaced. The default send routine is still generated, but not called, when you override it. If you wish to look at it to see how it sends the MIME header, MIME end and how it serializes the group components, it is called httpSendOutputStream and is found in:
<YourGenerateDirectory>/http_c/tr_http.c
Your send handler is placed in the callouts directory. See Generated Code for more details on the code generated and where it is located.
|
Tip - If you generate code from a design using the Get/Set shorthand notation described in Go Live, an example Send Handler is generated. You may wish to use this as a starting point. |
If you specify a receive data handler in the Customize dialog, this routine is called in addition to all of the communication protocol which X-Designer generates by default.
In C and C++ code, your routine is defined as returning an integer and taking two parameters:
For Java, the Receive Handler you specify is made a subclass of the X-Designer defined class, SCInputDataHandler. Add your own code to the doit() method. This method is "void" and takes one parameter which is an instance of the SCIData class, as defined in SCIData.java in the utils_java sub-directory.
The receive handler supplied by default ignores the returned data. You will almost certainly wish to parse the returned data. X-Designer is supplied with a full HTML parser. This parser is simple to use because it is data driven--that is, in the same way that widgets register an interest in the callbacks they wish to see, you can tell the parser which HTML tags you are interested in. This is all explained in detail in Extracting Information From HTML Data.
Your receive handler is placed in the callouts directory. See Generated Code for more details on the code generated and where it is located.
|
Tip - If you generate code from a design using the Get/Set shorthand notation described in Go Live, an example Receive Handler is generated. You may wish to use this as a starting point. |
X-Designer expects incoming data to conform to the MIME standard. If unexpected data is received, a routine in the client side of the application, generated by X-Designer, is called. This default routine, called scHTTPReply, simply prints the incoming data onto standard output. It is generated for you (into the callouts subdirectory) if you have a thin client or Internet Smart Code callback defined. It is generated in the language requested in the Generate dialog. This is the routine in C code:
If you specify your own routine as the "Out of Band Data" handler in the Customize dialog, the routine is defined in the same way as the default. The parameters it takes are exactly the same as those listed for the Receive Handler, which is described above.
For Java code, the format of the "Out of Band Data" handler is exactly the same as the Receive Handler--it is a subclass of the X-Designer defined class, SCInputDataHandler. Add your own code to the doit() method.
Your "Out of Band Data" handler is placed in the callouts directory. See Generated Code for more details on the code generated and where it is located.
The "Go Live!" toggle lets you turn the X-Designer dynamic display into a fully functional thin client interface. You can set the toggle for both thin client and Internet callbacks.
You must define and add the callback before the "Go Live!" toggle becomes enabled. For thin client Smart Code, the callback is the name of a routine in the server. For Internet Smart Code, it is the name of a callback in your client application.
X-Designer provides a shorthand getter or setter to allow you to create dynamic customization in the Customize dialog. This shorthand uses the convention of spreadsheet packages (the `@' sign) to indicate "the contents of...". For example, the following:
@text1
means "the contents of the widget named text1 in the specified Group". The specified Group is the one named in the callbacks dialog. This notation fetches the contents of a control when it is used in any of the "Connections" fields (URL and Proxies). When it is used in the Receive handler field, it is assumed that you wish to set the contents of text1 to the data received from the server.
The following example illustrates "Go Live!". It uses the World Wide Web to access a remote website and read a Web page. You will need to be running a Web server in order to complete this tutorial.
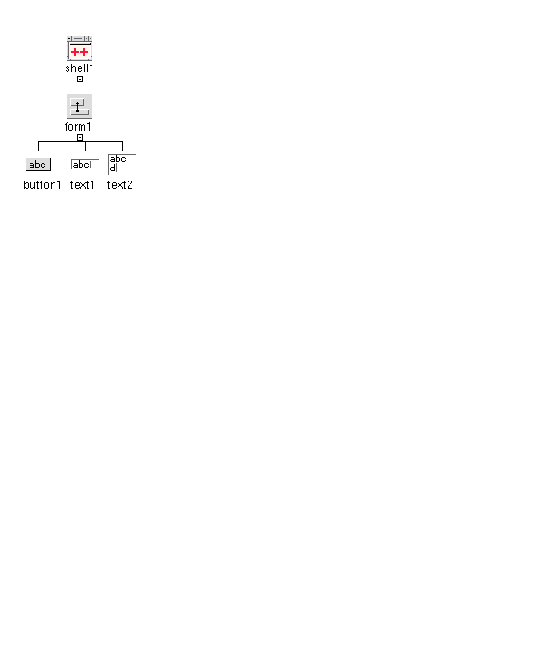
1. Create the hierarchy shown in FIGURE 17-9. This is a shell  form
form  {button, textfield, text}.
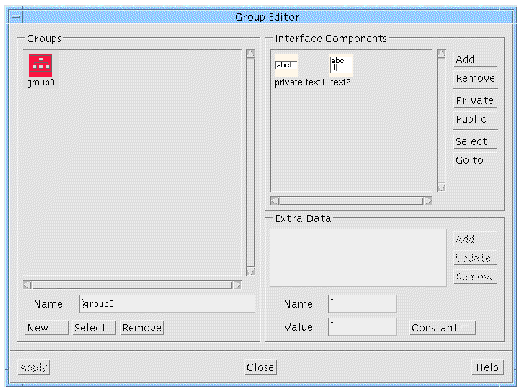
2. Create a Group, called group0, containing the textfield and text widget, making the textfield private.
This is shown in FIGURE 17-10.
3. Display the Callbacks dialog for button1.
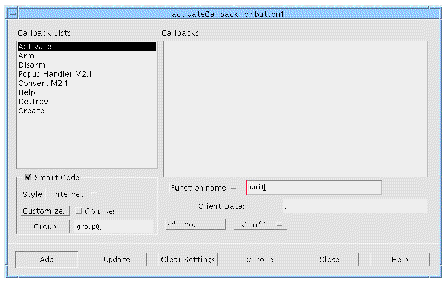
4. Set up an Internet Smart Code callback called "doit", as shown in FIGURE 17-11.
Don't add it yet as we need to customize it first.
5. Press the "Customize" button.
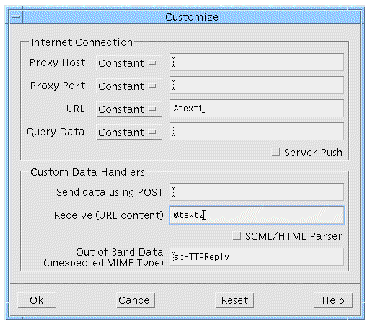
6. In the Customize dialog, put the getter shorthand notation for the contents of widget text1 into the "URL" field, as shown in FIGURE 17-12.
This shorthand notation is: @text1.
7. Put the shorthand notation for the widget text2 into the "Receive Handler" field, as shown in FIGURE 17-12.
|
Tip - If you are behind a firewall, you will also have to set the Proxy fields. See More on Proxies for details. |
8. Press "Ok" to save your settings and close the Customize dialog.
10. Set the "Go Live!" toggle and close the Callbacks dialog.
11. In the dynamic display's textfield (the one named "text1"), type the following URL:
12. Press button1 in the dynamic display.
The main page of the Website typed into the textfield is displayed in text2.
13. Try other URLs in text1 and press button1 again.
As long as you type a valid URL, text2 will display the HTML page to which the URL refers. For example, try typing the URL of your Intranet, if you have one.
This example connects to a real server dynamically from within X-Designer.
Code files providing toolkit-independent wrappers and the definitions of Group objects are generated when Smart Code is selected from the Callbacks dialog. More files are generated for "Thin Client" and "Internet" than for "Get/Set" because, in addition to the getters and setters for the Group, all the code for the communication with a server is generated and, in the case of "Thin Client", the server side of your application too.
Some of these files are in specially named directories which are created by X-Designer and which appear beneath the directory chosen in the Generate dialog. Other files appear in the chosen directory. FIGURE 17-5 shows the files generated for the thin client Smart Code tutorial. This gives you an idea of the files and subdirectories that are generated.
Most importantly, all your callbacks or other routines which may need editing (such as Custom Data Handlers, pre- and post-processing routines, Extra Data functions etc.) are kept together so that you may find them easily. You do not need to change any other code files.
Exactly what is generated differs according to whether you have requested only "Get/Set" Smart Code for your callbacks or you have asked for "Thin Client" or "Internet". The code generated in each case is described below.
If you are using groups but not Smart Code, an array of widgets is defined in the primary source file.
Without Smart Code, however, only the files described in the main User's Guide "Generated Code" chapter are generated and no new directories are created.
When generating code files, X-Designer uses an extension appropriate to the chosen language:
The following examples use the .c file extension simply as an illustration.
If you have selected the "Get/Set" style of Smart Code for one or more callback, the following files are generated into the directory specified at the top of the Callbacks dialog:
In addition, the following sub-directories are created:
|
Note - The "c" at the end of each directory name shows that C was the language chosen for code generation. If another language is chosen this is replaced accordingly. |
With "Get/Set" Smart Code, the following stubs files are generated:
FIGURE 16-10 shows a graphical representation of the files generated for the "Get/Set" Smart Code tutorial.
When you generate code from a design containing any Smart Code callbacks, all of the files and directories described in Get/Set Generated Code above are generated. In addition, the following directories are created by X-Designer:
The directory "server_c" contains all the files you need to build the server which will connect to the thin client application containing your user interface. The whole of this directory can be taken away to be built and run on a remote web server.
The Makefile in the top-level directory contains the rules for building both the client (your design) and the server. To build the client, you need only type make at the command line. To build the server, type make server at the command line.
|
Note - If you move the server code elsewhere, remember to take the Makefile too. |
The following types of stub can be generated when you create a thin client or Internet Smart Code callback. Some of these are optional, depending on whether you have specified any routines in the Customize dialog and in the Group Editor:
These are described separately below.
|
Tip - See Custom Data Handlers for details on adding your own data handlers and Extra Data--Function for information on adding extra functions to the Group. |
The file which contains your traditional, toolkit-dependent client callbacks is untitled_stubs.c (or untitled_stubs.cpp for C++ code generation).
This is the callbacks file generated when any callback is defined, regardless of whether Smart Code is being used or not. When you define a thin client or Internet Smart Code callback, X-Designer automatically generates a client side callback in this file. This contains toolkit-dependent code. You should only add code here which uses the toolkit.
The file which contains your toolkit-independent client callbacks is <callback>_cs.c (or <callback>_cs.cpp for C++ code generation).
For each thin client or Internet Smart Code callback, a file is generated into the callouts subdirectory using the name of the callback as the filename with the addition of "_cs" (standing for client server). The file contains the callback routine (or method in the case of C++ and Java). This contains toolkit-independent code with access to the Group.
Your server callbacks are located in server_c. There is a source file in this sub-directory for each callback you have defined. The file is given the same name as the callback.
A file is generated for each of the "Connections" in the Customize dialog, if "Function" is selected. Each file contains a get_<connection> and set_<connection> routine. The file is generated into the "callouts" subdirectory, using the name of the function that you specify as the filename.
A file is also generated for any custom data handlers specified in the Customize dialog. The filename is the name you type into the Customize dialog.
As described in Where to Add Your Own Code for Get/Set, stub routines are generated for any "Extra Data" functions defined in the Group Editor.
FIGURE 17-5 shows a graphical representation of the files generated for the "Thin Client" Smart Code tutorial.
In order to help you locate callbacks and familiarize yourself with the files generated, X-Designer also generates a set of HTML files. The main one is: index.html and is found in the top-level directory (i.e. the directory named in the Callbacks dialog).
This file, when opened in a web browser (or anything else which can read HTML) lists the files generated along with a brief description of each, as shown in FIGURE 17-13.
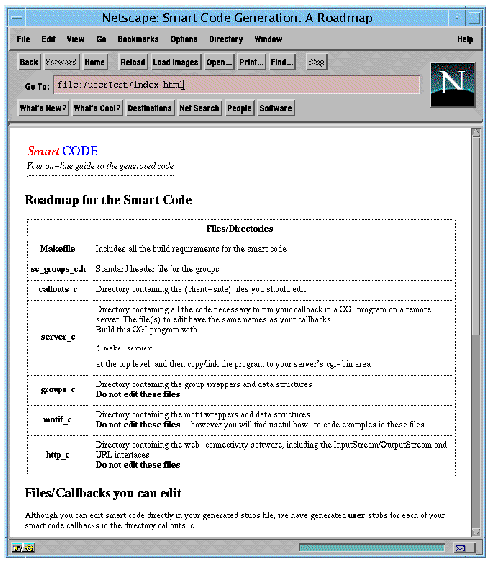
There are hypertext links to other files, also generated by X-Designer, which describe the code generated for each group and each Motif "wrapper".
This file also contains a link to the online reference material for Smart Code programming. You can view this reference material directly by opening the following file in an HTML browser:
$XDROOT/lib/locale/<YourLocale>/sc/index.html
where XDROOT is the install directory of your X-Designer and YourLocale is the locale you are using. If you are unsure about your locale, try typing locale into a terminal window. This prints out your locale information. Use the string assigned to LANG. Example locales are:
Copyright © 2003, Sun Microsystems, Inc. All rights reserved.