| C H A P T E R 18 |
|
Internet Smart Code |
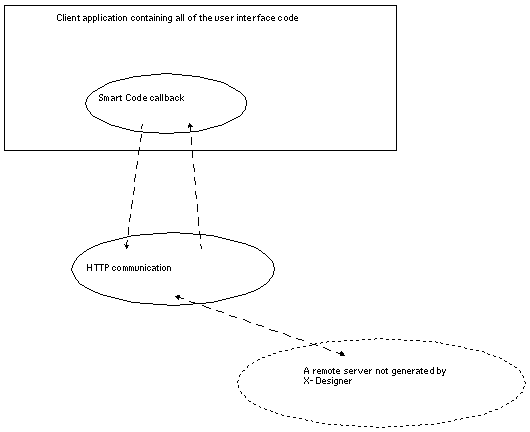
Choosing "Internet" Smart Code for a callback causes X-Designer to generate a client application from your design. Internet Smart Code programming is about accessing pre-existing Web pages and CGI programs on public servers across the World Wide Web. The Smart Code callback appears in the client application (in a sub-directory named "callouts"). FIGURE 18-1 shows the structure of an application generated by X-Designer when an "Internet" callback is defined. Unlike thin client Smart Code, only the client application and communication code is generated for this type of callback.
You will need to understand how to use both Groups and Get/Set Smart Code in order to use Internet (or thin client) Smart Code because Groups, along with their getters and setters, are the nuts and bolts of all types of Smart Code. Look in the following for more information:
The "Go Live" feature allows you to use X-Designer's dynamic display as a prototype client in order to test your interface on live data as you are developing it. The tutorial starting in Simple Internet Smart Code Tutorial shows you how to do this and how to generate the application using a very simple example.
The use of "Go Live" for Internet Smart Code prototyping is limited because you will need to write your own Receive Handler to process and act on the incoming data.
 [ D ]
[ D ]
Internet and thin client Smart Code are similar:
These similarities mean that parts of their user interface within X-Designer are shared. In order to use Internet, you may need to refer to the following sections which can be found in :
Internet is, however, distinct from thin client:
Applications generated with Internet Smart Code might be used to:
For applications generated with Internet Smart Code you will need to provide a Receive Handler. X-Designer gives you a pointer to any data returned, but it is up to you to handle that data. Data handlers are part of the Customize dialog and described in . To make use of the data returned, X-Designer provides a library which allows you to express an interest in particular features of the input stream and then "pick out" these features as they arrive. This is described in Extracting Information From HTML Data.
You can either process the data as a stream or you can use the InputData class or object X-Designer provides to access it through the getData() and getSize() methods. This is particularly useful if you are downloading data to send to a display widget--for example, a gif or jpeg image. For C code, the InputData object is a data structure. For C++ and Java it is a class. See the online reference material for details of InputData by opening this file in an HTML browser and following the appropriate links:
$XDROOT/lib/locale/<YourLocale>/sc/index.html
where XDROOT is the install directory of your X-Designer and <YourLocale> is the locale you are using.
For a simple example of how to process incoming data, generate code from your design after setting up an Internet Smart Code callback with the "Go Live" toggle set which uses the "@<widgetname>" shorthand notation as the Receive Handler. This is exactly what you will do in Simple Internet Smart Code Tutorial below.
X-Designer assumes, if you have chosen "Internet" Smart Code, that you are fetching data from a location on the Internet and therefore uses the GET HTTP protocol. If you override the send handler by specifying a function name for it in the Customize dialog, X-Designer uses the POST protocol.
This example introduces you simply and quickly to Internet Smart Code. It connects to a real Web site and downloads data from it. You will see this happening both within X-Designer, using "Go Live", and in your generated application.
In order to get you familiar with the use of Internet Smart Code quickly, this example does not attempt to parse the returned data. Parsing of HTML is described in Extracting Information From HTML Data.
|
Note - This tutorial shows you how to connect to a remote server, so make sure you are working from a computer configured to do this. |
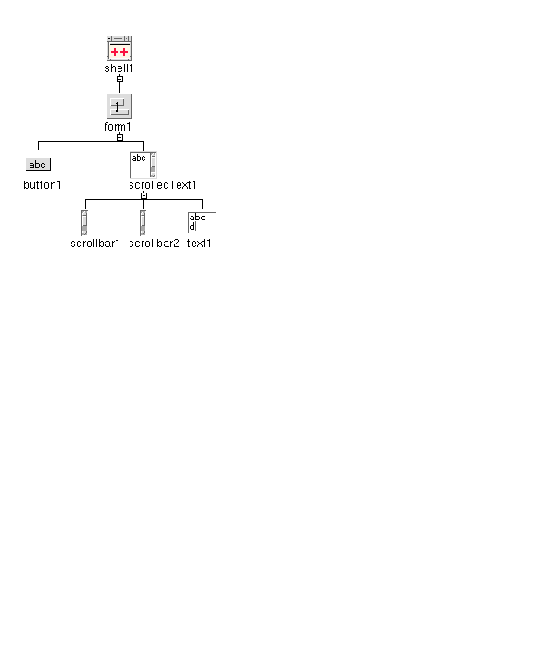
1. Create a hierarchy containing the widgets shown in FIGURE 18-2.
These are: session shell  form
form  {button, scrolled text}.
2. In the Layout Editor, attach the scrolled text widget to the bottom and right edges of the form so that it resizes when the window is resized.
This is a purely cosmetic step--so that you are able to see the returned data more easily.
3. Select text1 (the text area of the scrolled text widget). Press the "Add to New Group" on the toolbar.
This button is shown in FIGURE 18-3.

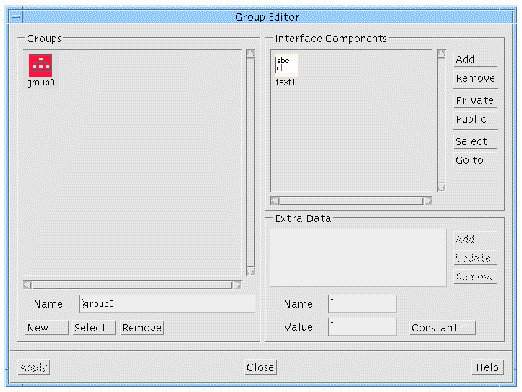
4. When the Group Editor appears, check that it shows a group named group0 containing a text widget as its only member, as shown in FIGURE 18-4.
We do not need to make any changes, we shall use the Group as created by X-Designer.
6. Select button1 and display the Callbacks dialog.
7. Check that "Activate" is selected from the list on the left and put in goInternet as the name of the callback.
Do not add this callback yet as we have to define the Smart Code for it.
8. Set the "Smart Code" toggle.
9. Choose "Internet" form the option menu of Smart Code flavors.
10. Select Group0 as the Group for this callback.
Do this by pressing the "Group" toggle, making sure that Group0 is selected and pressing "Apply".
11. Press the "Customize" button.
This displays the Customize dialog.
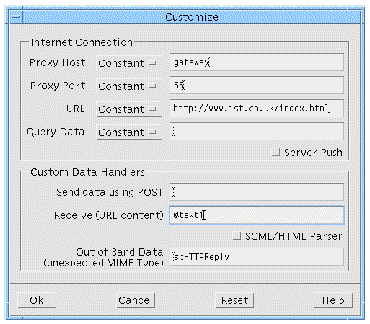
12. In the Customize dialog, type the following URL in the URL field:
http://www.ist.co.uk/index.html
13. If you are behind a firewall, set the Proxy host and port.
14. In the Receive handler field type: @text1
|
Tip - See for information on the use of "@" in these fields. |
15. Press "Ok" in the Customize dialog.
The completed Customize dialog is shown in FIGURE 18-5.
|
Note - The Customize dialog shows fictitious proxies as an example--you must enter those which are relevant to your network, as described in . |
16. Press "Add" to add your new callback.
17. Still in the Callbacks dialog, set the "Go Live" toggle.
When you set "Go Live" you do not need to "Update" the callback. The callback is immediate "Live".
18. In the dynamic display, press button1.
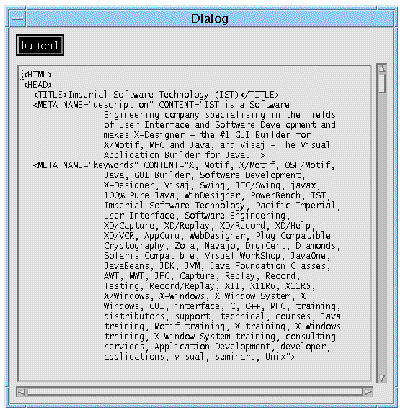
There is a a pause while the connection is made with the remote server, then the returned data (which is the Web page specified in the Customize dialog) appears in text1, as shown in FIGURE 18-6.
The final stage of this tutorial shows you the same occurring in the generated application.
19. Generate code for your Internet enabled design.
You can generate any flavor of code, as long as you are able to compile it.
20. Compile the generated code.
21. Run your client application.
Your application connects to the remote server and displays the specified Web page.
Having completed this tutorial, you may like to try some more advanced features of thin client and Internet Smart Code. Provided as part of your X-Designer package are HTML files containing instructions for running supplied XD/Replay scripts which run the tutorials for you. You simply watch it running and then examine the results. Open the following files in an HTML browser:
|
Note - XDROOT is the install directory of your X-Designer and "YourLocale" is the name of the locale you are using. |
An application developed with Internet Smart Code might be used to fetch a Web page, parse it and display the result. To help you organize any HTML data returned by a server and to considerably simplify the process, a full, yet simple to use, HTML parser is supplied with X-Designer.
As a result of the origins and intentions of the World Wide Web, most of the data fetched from Web servers will be in HTML. The parser is based on the reference SGML parser materials from the SGML User Group[1]. It has been adapted to produce a general purpose SGML parser engine. SGML works in conjunction with a DTD (Document Type Definition) to define a markup language. The DTD for HTML is supplied with X-Designer
By adding extra DTDs, you can use the parser with other standard and in-house markup languages. You will also be able to upgrade your application for future versions of HTML and for XML.
The SGML parser has a simple and convenient programming interface. You register your interest in one or more features of the input stream (i.e. the HTML tags) and a routine of your choosing is called whenever the parser finds one of these features. This is analogous to the widget callback mechanism--widgets register their interest in certain actions and a given routine is called when such actions occur.
|
Note - If you are not familiar with the Web technology which this uses (or you are confused by the list of acronyms), you may need to do some background reading. See Books on Networking and World Wide Web, for a list of suggested books. |
To tell X-Designer that you wish to use the parser to extract key information from the incoming data, set the "SGML/HTML Parsing" toggle in the Customize dialog. In your Receive Handler, set up the parser according to your requirements and then send the data to the parser. Exactly how to do all of this (and what happens next) is detailed below.
Once you have told X-Designer that you wish to process SGML/HTML by selecting the toggle in the Customize dialog, the following four steps are needed. Each of these takes place inside your Receive Handler:
1. Register the MIME type by calling the routine scRegisterSGMLMimeType (or the shortcut for HTML scRegisterHTML).
2. Register an error handler by calling the routine scRegisterSGMLMimeErrorHandler. This is an optional step.
3. Register an interest in one or more features of the input stream by calling the routines scAddTagCallback and scAddAttrCallback. Alternatively at this point you can request a traditional parse tree.
4. Call the parser using the routine scProcessSGML.
Each of these steps is examined more closely in the following sub-sections.
Before programming the interface to the parser, make sure that you are including the following header file:
#include <SGML.h>
The directory of this header file, which is part of the X-Designer distribution, is automatically included in the Makefile.
In addition, you will need to set the DTDDIR environment variable to:
$XDROOT/src/sgml/dtds
Practical Information for Using the Parser provides some more information on the location of the SGML parser and the files it uses.
In order to configure the parser, you first need to create an SGML object. This object is then passed to any other routines you need to call. An SGML object is returned from the routine you call to register the MIME type of your data, which is shown below:
Use this to associate a MIME type with an SGML DTD. The most common will be:
SGML_t * sgm = scRegisterSGMLMimeType( "text/html", "HTML32.soc");
Because this is the most commonly used, the following is supplied as a shortcut:
This does exactly the same as the one above, associating "text/html" with the HTML32 DTD. Add your own DTD by placing it in the directory referenced by the DTDDIR environment variable.
The following shows what is generated when "processMyData" has been specified as the Receive Handler, with "SGML/HTML Parser" set. A line has been added to register the MIME type:
The default error handler outputs error messages to standard output. You can override this by registering your own error handler using the following routine:
Your error handler should be of the form:
To access the parsed data, you should register an interest in one or more features of the input (e.g. particular tags and attributes in HTML).
Registering interest in input features is directly analogous to the widget callback mechanism where widgets register their interest in certain actions and a specified routine (callback) is called when the action occurs. Here, you register your interest in features of the language and the parser calls your callback routines when it comes across one of these features.
There are two major features of HTML: tags and attributes. You can register an interest in these features using one of the two routines described in subsequent sections. First, though, a brief description of what is meant by tag and attribute.
Tags are features of HTML which describe the format of the following piece of text. Tags appear in angle brackets, for example <menu> to indicate a bulleted list or <code> to indicate a code listing. The following example shows a "menu" block containing individual list items:
Attributes are another feature of HTML. They also appear inside angle brackets. Attributes are placed after the tag and are used to indicate a reference. This may be an external file, an image or a position elsewhere in the document. Attributes are always made up of a reserved string, an equals sign (=) and the reference. The following example shows two attributes. The first, an "href", names the destination of a link (somewhere called "bottom"). The text inside the block, "Go to bottom of page", is the "visible" part of this link. The second attribute is a "name". It names a location--in this case "bottom". So, from a user point of view, selecting "Go to bottom of page", moves the view to the named location "bottom":
There are two routines which you can use to register your interest in particular HTML language features. These are:
The following sections explain these registration routines.
The SGML parser needs to know which parts of the HTML input you are interested in. It also needs to know at what point within the selected block of HTML to call your callback routine.
The routine for registering interest in tag elements is:
The parameters to this routine need more explanation. They are detailed in the following sub-sections.
This is the SGML object returned from the scRegisterSGMLMimeType, the routine for registering the MIME type of your data. scRegisterSGMLMimeType is described in Registering the MIME Type.
This is the tag in which you are interested. Do not include the angle brackets, simply the tag itself in upper case e.g. "A" or "MENU" or "LI".
This parameter tells the parser when within the chosen tag to call your callback routine. In addition, which "type" you choose determines whether your callback routine is passed any of the data from inside the selected block of HTML or not. Your callback routine always receives the tagname and the type (so that you can use the same routine for any number of different tags and types) but only "ON_ATTR" and "ON_DATA" cause any more information to be returned.
You have a choice of four pre-defined types, according to where in the tag block you wish your callback routine to be called as illustrated in FIGURE 18-7. The four types are:

This is the name of the routine which the parser should call when it comes across a tag you are interested in (the callback routine). This is a routine defined by you. The format of this routine is described in Your Callback Routine.
This parameter gives you a chance to pass data to your callback routine. This will be passed to your routine as its "client data" parameter.
You may register an interest in any number of tags, calling this routine once for each tag.
The routine for registering interest in attributes is:
int scAddAttrCallback( sgm, tagname, attrname, callback, data) SGML_t * sgm; char * tagname; char * attrname; void (*callback)(); void * data; |
The only parameter which is different from those described for the tag registering routine above, is char * attrname. This is the name of the attribute in which you are interested.
You may register an interest in any number of attributes.
There is no stub file for your callback routine. You must write it all yourself. The name of the routine is the name specified as the fourth parameter to scAddAttrCallback or scAddTagCallback (that is, the parameter called "callback").
Your callback routine is called by the parser when it detects a tag or attribute in which you have registered an interest. The following example shows what your callback should look like and lists the parameters passed in:
int mycallback( tag, attribute, type, call_data, client_data) char * tag; char * attribute; int type; void * call_data; void * client_data; |
The parameters passed into your routine are:
then this parameter would be "#regmime".
If you have specified "ON_DATA" as the type, this gives you the data after the tag. See FIGURE 18-7 for an illustration.
Because you may register an interest in any number of tags or attributes, you can also have any number of callback routines, but having one for tags and another for attributes is probably the most useful combination.
Once you have configured an SGML object by specifying the MIME type, registering error handlers and registering interest in particular input stream features, you are ready to call the parser. Here is the routine to do this:
int scProcessSGML( sgm, istream) SGML_t * sgm; /* the parser handle scRegisterSGMLMimeType */ InputStream * istream; /* the input stream from the server */ |
The first parameter is described in the preceding sections. The second parameter, the input stream, is passed to your Receive Handler.
This section provides an illustration of the use of the SGML parser. When you specify in the Customize dialog that you wish to have SGML parsing, you also need to provide a name for a Receive Handler. Here is the stub for the handler which is generated by X-Designer:
In order to make use of the SGML parser, you will have to add some code to this routine in order to create an SGML object, configure it and then send the incoming data to the parser. Here is the Receive Handler with extra code for parsing incoming HTML:
This routine specifies that getanchor should be called whenever the parser finds an anchor tag (<a>) and getlinkinfo should be called whenever the "href" attribute is found. These routines, written by yourself, should look like this:
|
Note - See Going a Step Further for information on how to run an on-line XD/Replay script which makes use of the parser. |
To use the SGML parser, you will need to link with precompiled code. The sources are available in:
The license provisions mean that you are free to use them as you wish.
To begin with, it is easier to use the precompiled version which comes with X-Designer.
The SGML parser uses the following files and directories:
Before compiling, you should make sure that:
 Standard Generalized Markup Language Users' Group (SGMLUG) SGML Parser Materials. Written by James Clark.
Copyright © 2003, Sun Microsystems, Inc. All rights reserved.